Quickstart
In this guide, you will learn how to get started with Terramate from scratch by building a basic Terramate project that manages Terraform or OpenTofu in stacks using the most essential Terramate features, such as stacks, code generation, orchestration, and change detection.
Onboard Terramate to existing project
If, instead, you want to learn how to use Terramate in an existing project, go here:
Terramate Community Discord Server
Join the Terramate Community on Discord, the best place to ask questions and get answers about Terramate and its ecosystem. Come aboard ⛵️🏴☠️
Introduction
For a quick example of how Terramate works, this guide takes you through the following steps:
- Creating a new Terramate project.
- Adding stacks using Terramate CLI.
- Generating a Terraform local backend configuration in all stacks using code generation.
- Orchestrating commands such as
terraform planandterraform applyusing orchestration and change detection. - Syncing all stacks to Terramate Cloud.
Prerequisites
To start using Terramate, let's quickly run through some steps to ensure the correct setup of your environment.
Install Terramate
brew install terramate# Add the Terramate repo to your sources
echo "deb [trusted=yes] https://repo.terramate.io/apt/ /" \
| sudo tee /etc/apt/sources.list.d/terramate.list
apt update
apt install terramate# Add the Terramate repo to your sources
sudo tee /etc/yum.repos.d/terramate.repo <<EOF
[terramate]
name=Terramate Repository
baseurl=https://repo.terramate.io/yum/
enabled=1
gpgcheck=0
EOF
dnf install terramate# Download the binary from
https://github.com/terramate-io/terramate/releasesOther installation options are available. When the installation is complete, you can test it out by reading the current version:
$ terramate versionInstall Terraform or OpenTofu
Next, install Terraform or OpenTofu:
Create a new project
Terramate requires a git repository, and every git repository is a project in Terramate.
Let's create a new repository terramate-quickstart to set up your first Terramate project.
$ git init -b main terramate-quickstart
$ cd terramate-quickstart
New git repositories are empty per default and don't contain any commits. The change detection in Terramate works by detecting changes between at least two commits. Let's add an initial, empty commit to the repository:
$ git commit --allow-empty -m "Initial empty commit"Create stacks
Now that the repository is ready, you can create your first stack. Stacks in Terramate are a collection of infrastructure resources that you configure, provision, and manage as a unit.
We will give the stack an optional name and description upon creation to track the purpose and details of a stack.
Terramate will ensure that on creation, each stack gets an id set automatically if not defined by the user.
$ terramate create \
  --name "Alice" \
  --description "Alice's first stack" \
  stacks/alice
The terramate create command creates a file stack.tm.hcl containing a stack {} block to configure the stack, which will look something like this.
$ cat stacks/alice/stack.tm.hcl

stack {
  name        = "Alice"
  description = "Alice's first stack"
  id          = "5b33e1c4-a3b0-477d-b0f1-add5918f764d"
}
How does Terramate detect stacks?
Stacks in Terramate are identified by a directory that includes a *.tm.hcl file, which contains a stack {} block. The file can have any name but the terramate create command always creates a file named stack.tm.hcl
Next, let's check in our newly created stack to the repository:
$ git add stacks/alice/stack.tm.hcl
$ git commit -m "Create a first stack with Terramate"
To verify that Terramate is aware of the new stack, you can run terramate list, which returns a list of all stacks available in your project.
$ terramate list
stacks/alice
To create a second stack, we follow the same commands. First, we create the stack:
$ terramate create \
  --name "Bob" \
  --description "Bob's first stack" \
  stacks/bob
Next, we add the second stack to our repository:
$ git add stacks/bob/stack.tm.hcl
$ git commit -m "Create a second stack with Terramate"
To verify that Terramate is aware of both stacks, we can run terramate list again.
$ terramate list
stacks/alice
stacks/bob
Change detection in action
Since we created our stacks step by step and created a git commit per stack, we can leverage change detection to see what changes we introduced in our latest commit.
$ terramate list --changed
stacks/bob
By running the command mentioned above, you will see only the second stack is listed now, as we newly introduced the second stack without changing the first stack. Terramate’s change detection is based on a Git integration but also supports more integrations like Terraform to detect affected stacks using a local Terraform Module that has been updated outside of the stack.
Code generation
Empty stacks are of not much use. One of Terramate’s primary use cases is orchestrating IaC tools such as Terraform and generating code for it - but Terramate is not limited to Terraform and can also be used with other tooling such as OpenTofu, Terragrunt, Kubernetes, Helm, CloudFormation, etc.
Every Terraform stack will need a backend configuration. For the sake of this guide, we will use the Terraform local backend.
To generate backend code we create a file called stacks/backend.tm.hcl:
$ cat <<EOF >stacks/backend.tm.hcl
generate_hcl "backend.tf" {
  content {
    terraform {
      backend "local" {}
    }
  }
}
EOF$ cat <<EOF >stacks/backend.tm.hcl
generate_hcl "backend.tf" {
content {
terraform {
backend "local" {}
}
}
}
EOFThis configures Terramate to generate a backend.tf file in every stack it can reach within the stacks/ directory. In this case, it applies to our alice and bob stacks.
To trigger the code generation we need to run the terramate generate command:
$ terramate generate

Code generation report

Successes:

- /stacks/alice
  [+] backend.tf

- /stacks/bob
  [+] backend.tf

Hint: '+', '~' and '-' mean the file was created, changed and deleted, respectively.
The generation report will report any changes in the generated code.
Let’s commit the changes and generated code:
$ git add stacks
$ git commit -m 'Add a backend configuration to all stacks'
TIP
It's a recommended best practice to check in generated code to your repository. For details, please see code generation best practices.
Orchestration in action
The stacks created in the previous sections represent isolated environments, often referred to as "root modules" in Terraform and OpenTofu. To make them functional, we must run terraform init or tofu init in both. Terramate allows you to orchestrate any command in stacks using the terramate run command.
But before we can start, we need to prepare git to ignore temporary Terraform files by adding a .gitignore file, which is located in the root directory of our repository:
# NOTE:
# You might not want to add state and lock file here
# This is just convenient when running the quickstart guide
$ cat <<EOF >.gitignore
.terraform
.terraform.lock.hcl
*.tfstate
terraform.tfstate
terraform.tfstate.backup
*.tfplan
EOF

$ git add .gitignore
$ git commit -m 'Add .gitignore'
Now let’s initialize our stacks:
$ terramate run terraform init$ terramate run tofu initAnd run a Terraform plan:
$ terramate run terraform plan$ terramate run tofu planAdd Terraform resources
In this section, we create a Terraform null resource for demonstration. Null Resources do not need to configure any cloud credentials as they do not create real resources but only virtual ones.
This example will show:
- You can use plain Terraform config in any stack without using code generation.
- Running only on changed stacks can save us time running and reviewing.
$ cat <<EOF >stacks/bob/null.tf
resource "null_resource" "quickstart" {
}
EOF

$ git add stacks/bob/null.tf
$ git commit -m "Add a null resource"$ cat <<EOF >stacks/bob/null.tf
resource "null_resource" "quickstart" {
}
EOF
$ git add stacks/bob/null.tf
$ git commit -m "Add a null resource"To apply the changes, re-initialize Terraform and run terraform apply in the updated stacks. As we only added the resource to the bob stack, we can leverage change detection to run in the changed stack only.
Running commands only in stacks containing changes allows us to keep execution run times fast and blast radius small.
Re-initialize Terraform to download the null provider:
$ terramate run --changed terraform init$ terramate run --changed tofu initPreview a plan:
terramate run --changed terraform planterramate run --changed tofu planAfter reviewing the plan, we can apply the changes:
terramate run --changed terraform apply -auto-approveterramate run --changed tofu apply -auto-approveWhen running the terraform plan again, we expect no changes to be planned anymore:
terramate run --changed terraform planterramate run --changed tofu planConnecting Terramate Cloud
Now that you have created your first Terramate project, let's connect it to Terramate Cloud and learn how we can enable observability, CI/CD, drift detection, and more! Terramate CLI and Terramate Cloud work in tandem to deliver a reliable experience. Terramate Cloud is free for individual use, with features available for teams.
Create a cloud account
To start using the cloud, you need to sign up for a free cloud account and create an organization.
- Sign in and Sign up to cloud.terramate.io and
- Create your Organization. You can edit GitHub Trust settings to establish a trust relationship with GitHub Actions, which is required to sync data from GitHub, and specify whether to sync the entire organization or a specific repository with Terramate Cloud. Similarly, GitLab Trust settings can be configured to sync data from GitLab.
Remember the organization's short name that you set for accessing the organization on Terramate Cloud to configure your Terramate CLI in the next steps.
Configure your repository
Configure your Terramate project to sync data to your Terramate Cloud organization after creating it.
$ cat <<EOF >terramate.tm.hcl
terramate {
  config {
    cloud {
      organization = "organization-short-name" # TODO: fill in your org short name
    }
  }
}
EOF

$ git add terramate.tm.hcl
$ git commit -m "Add Terramate Cloud configuration"
Create a GitHub repository
Terramate Cloud requires a GitHub, GitLab, or BitBucket repository to work properly. We will use GitHub in this guide. Let's start by creating a new repository in your personal GitHub account or an organization. We'll name the repository terramate-quickstart and create it as a private repository.
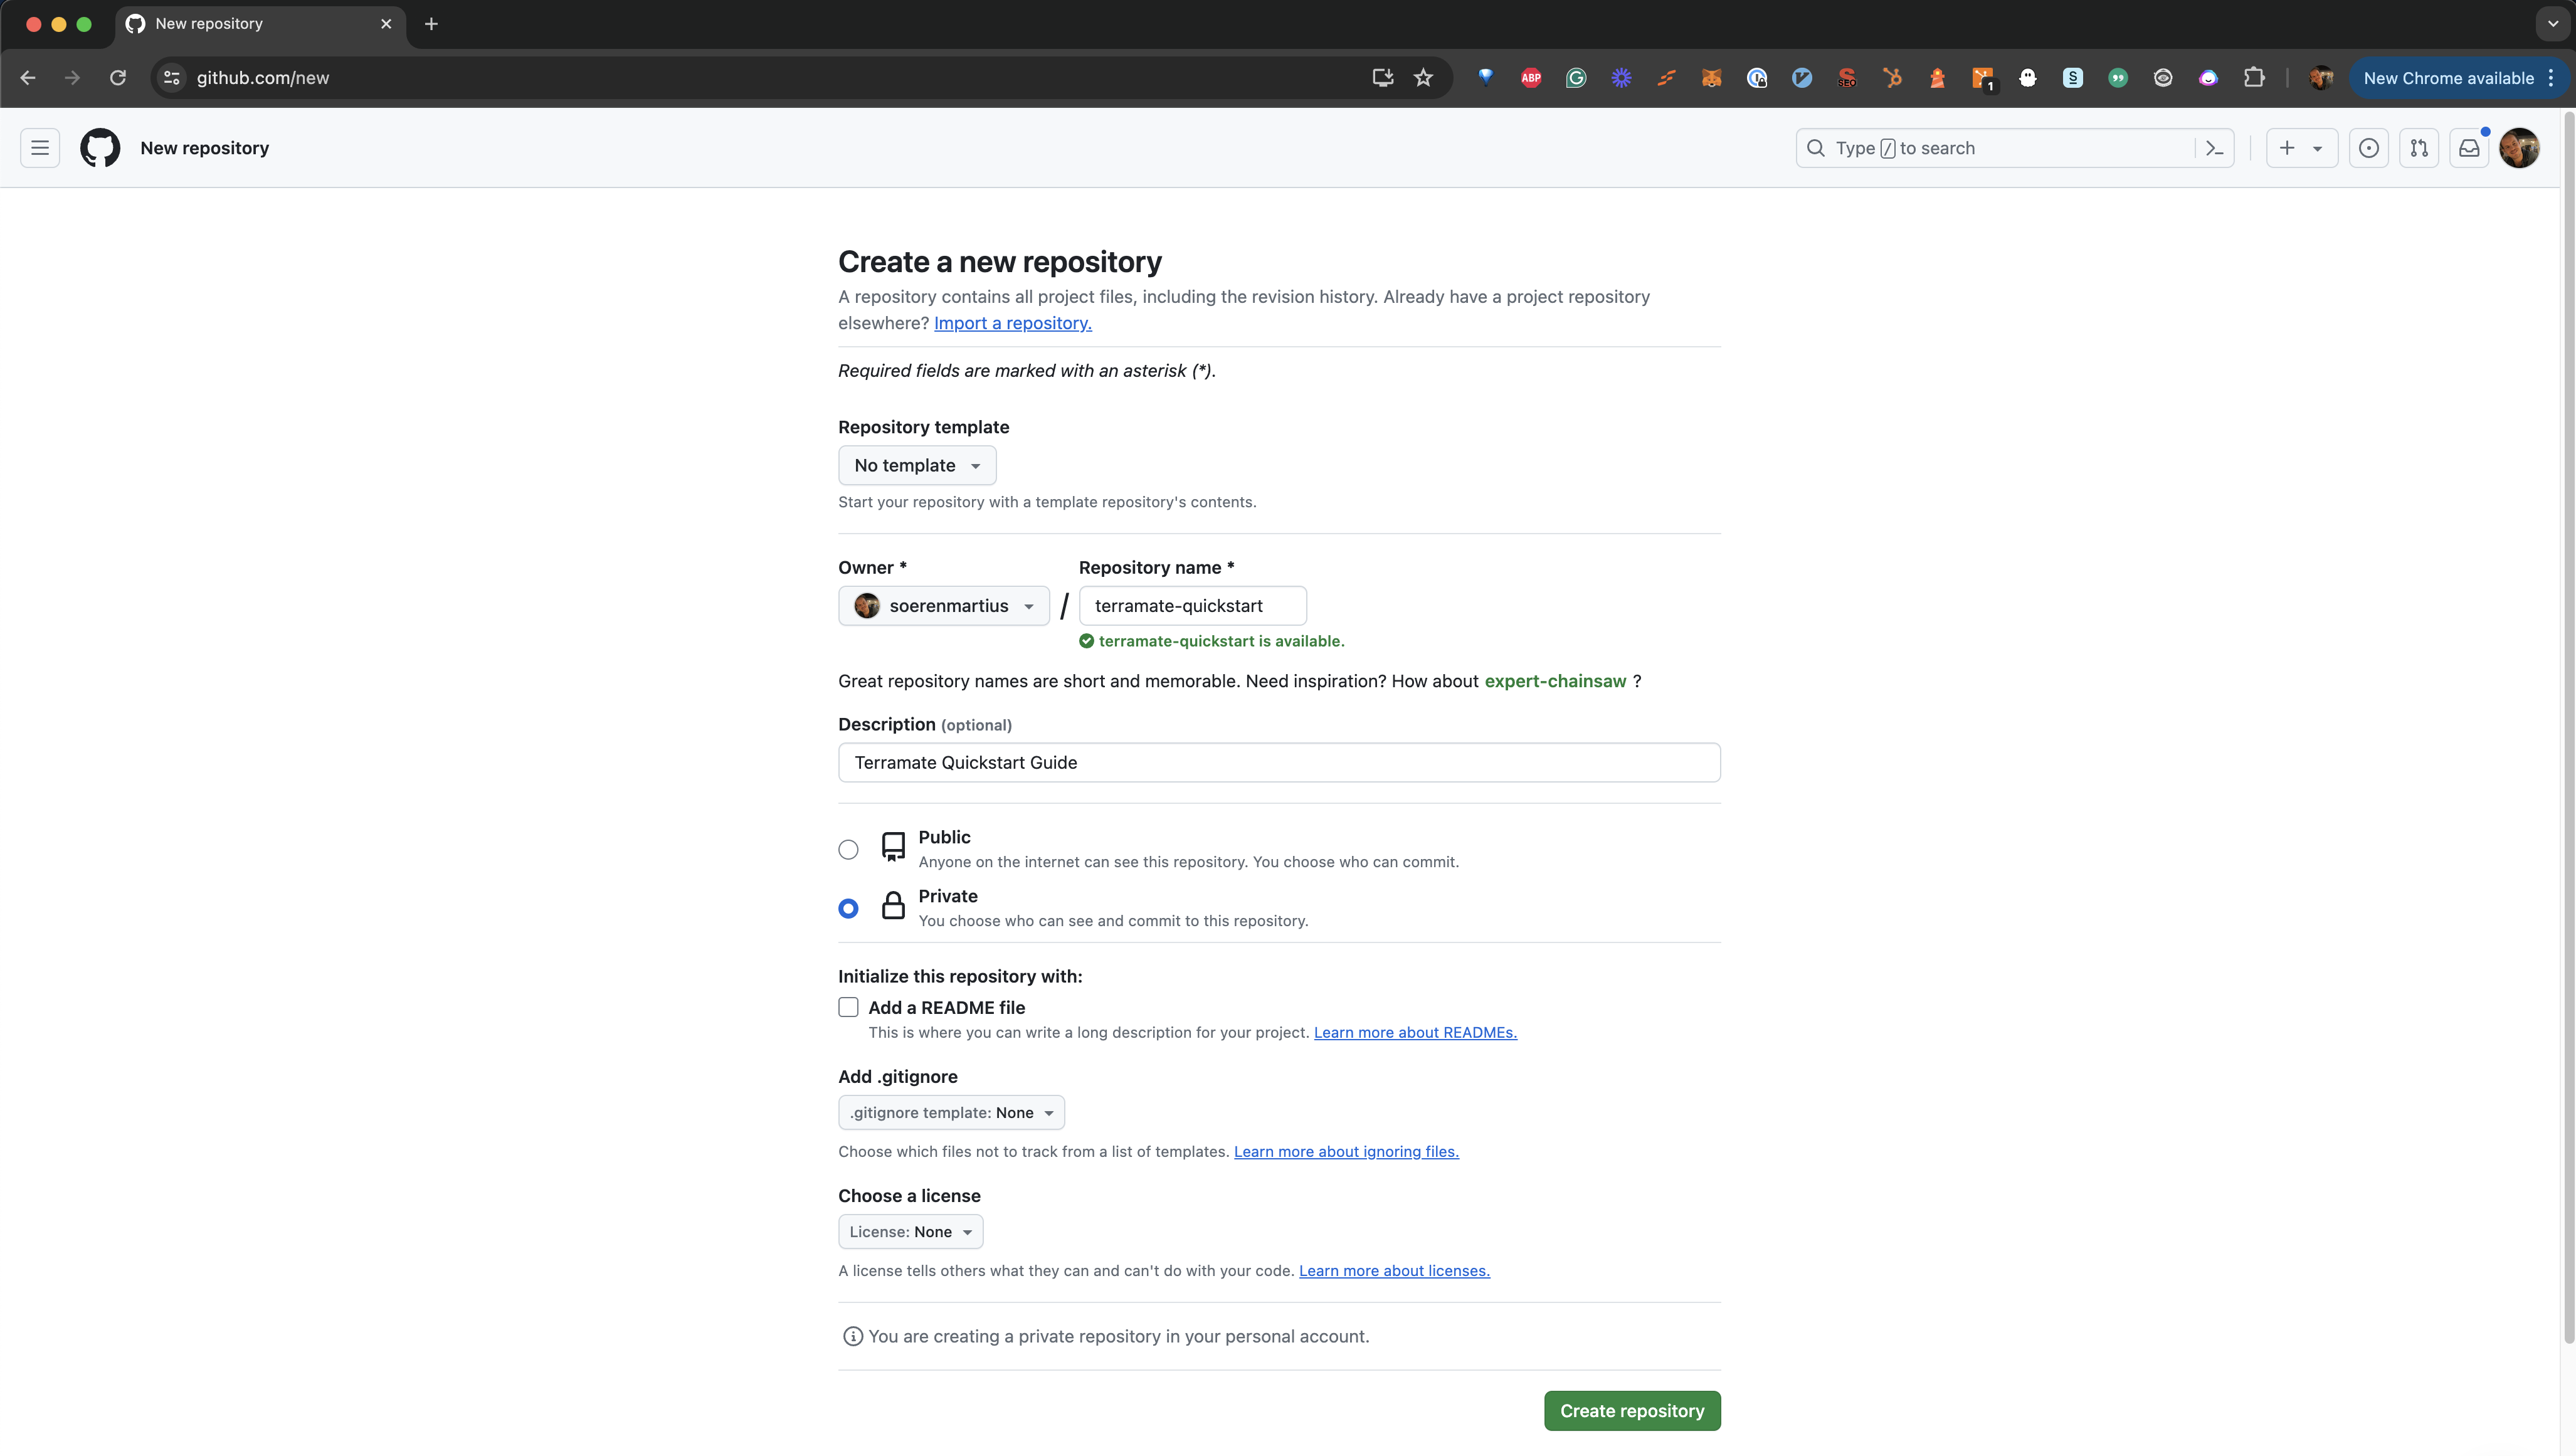
Once the repository is created on GitHub, you can add it to your local repository and push your data to GitHub. Don't forget to replace your-account with your GitHub account or organization handle.
$ git remote add origin git@github.com:your-account/terramate-quickstart.git
$ git branch -M main
$ git push -u origin main
Login from CLI
To synchronize data from your local machine, you will need to login to Terramate Cloud from the CLI. Terramate CLI will store a session on your machine after a successful login.
Use the following command to initiate the login.
$ terramate cloud loginIf you want to login with GitHub instead, use:
$ terramate cloud login --githubSync stacks to Terramate Cloud
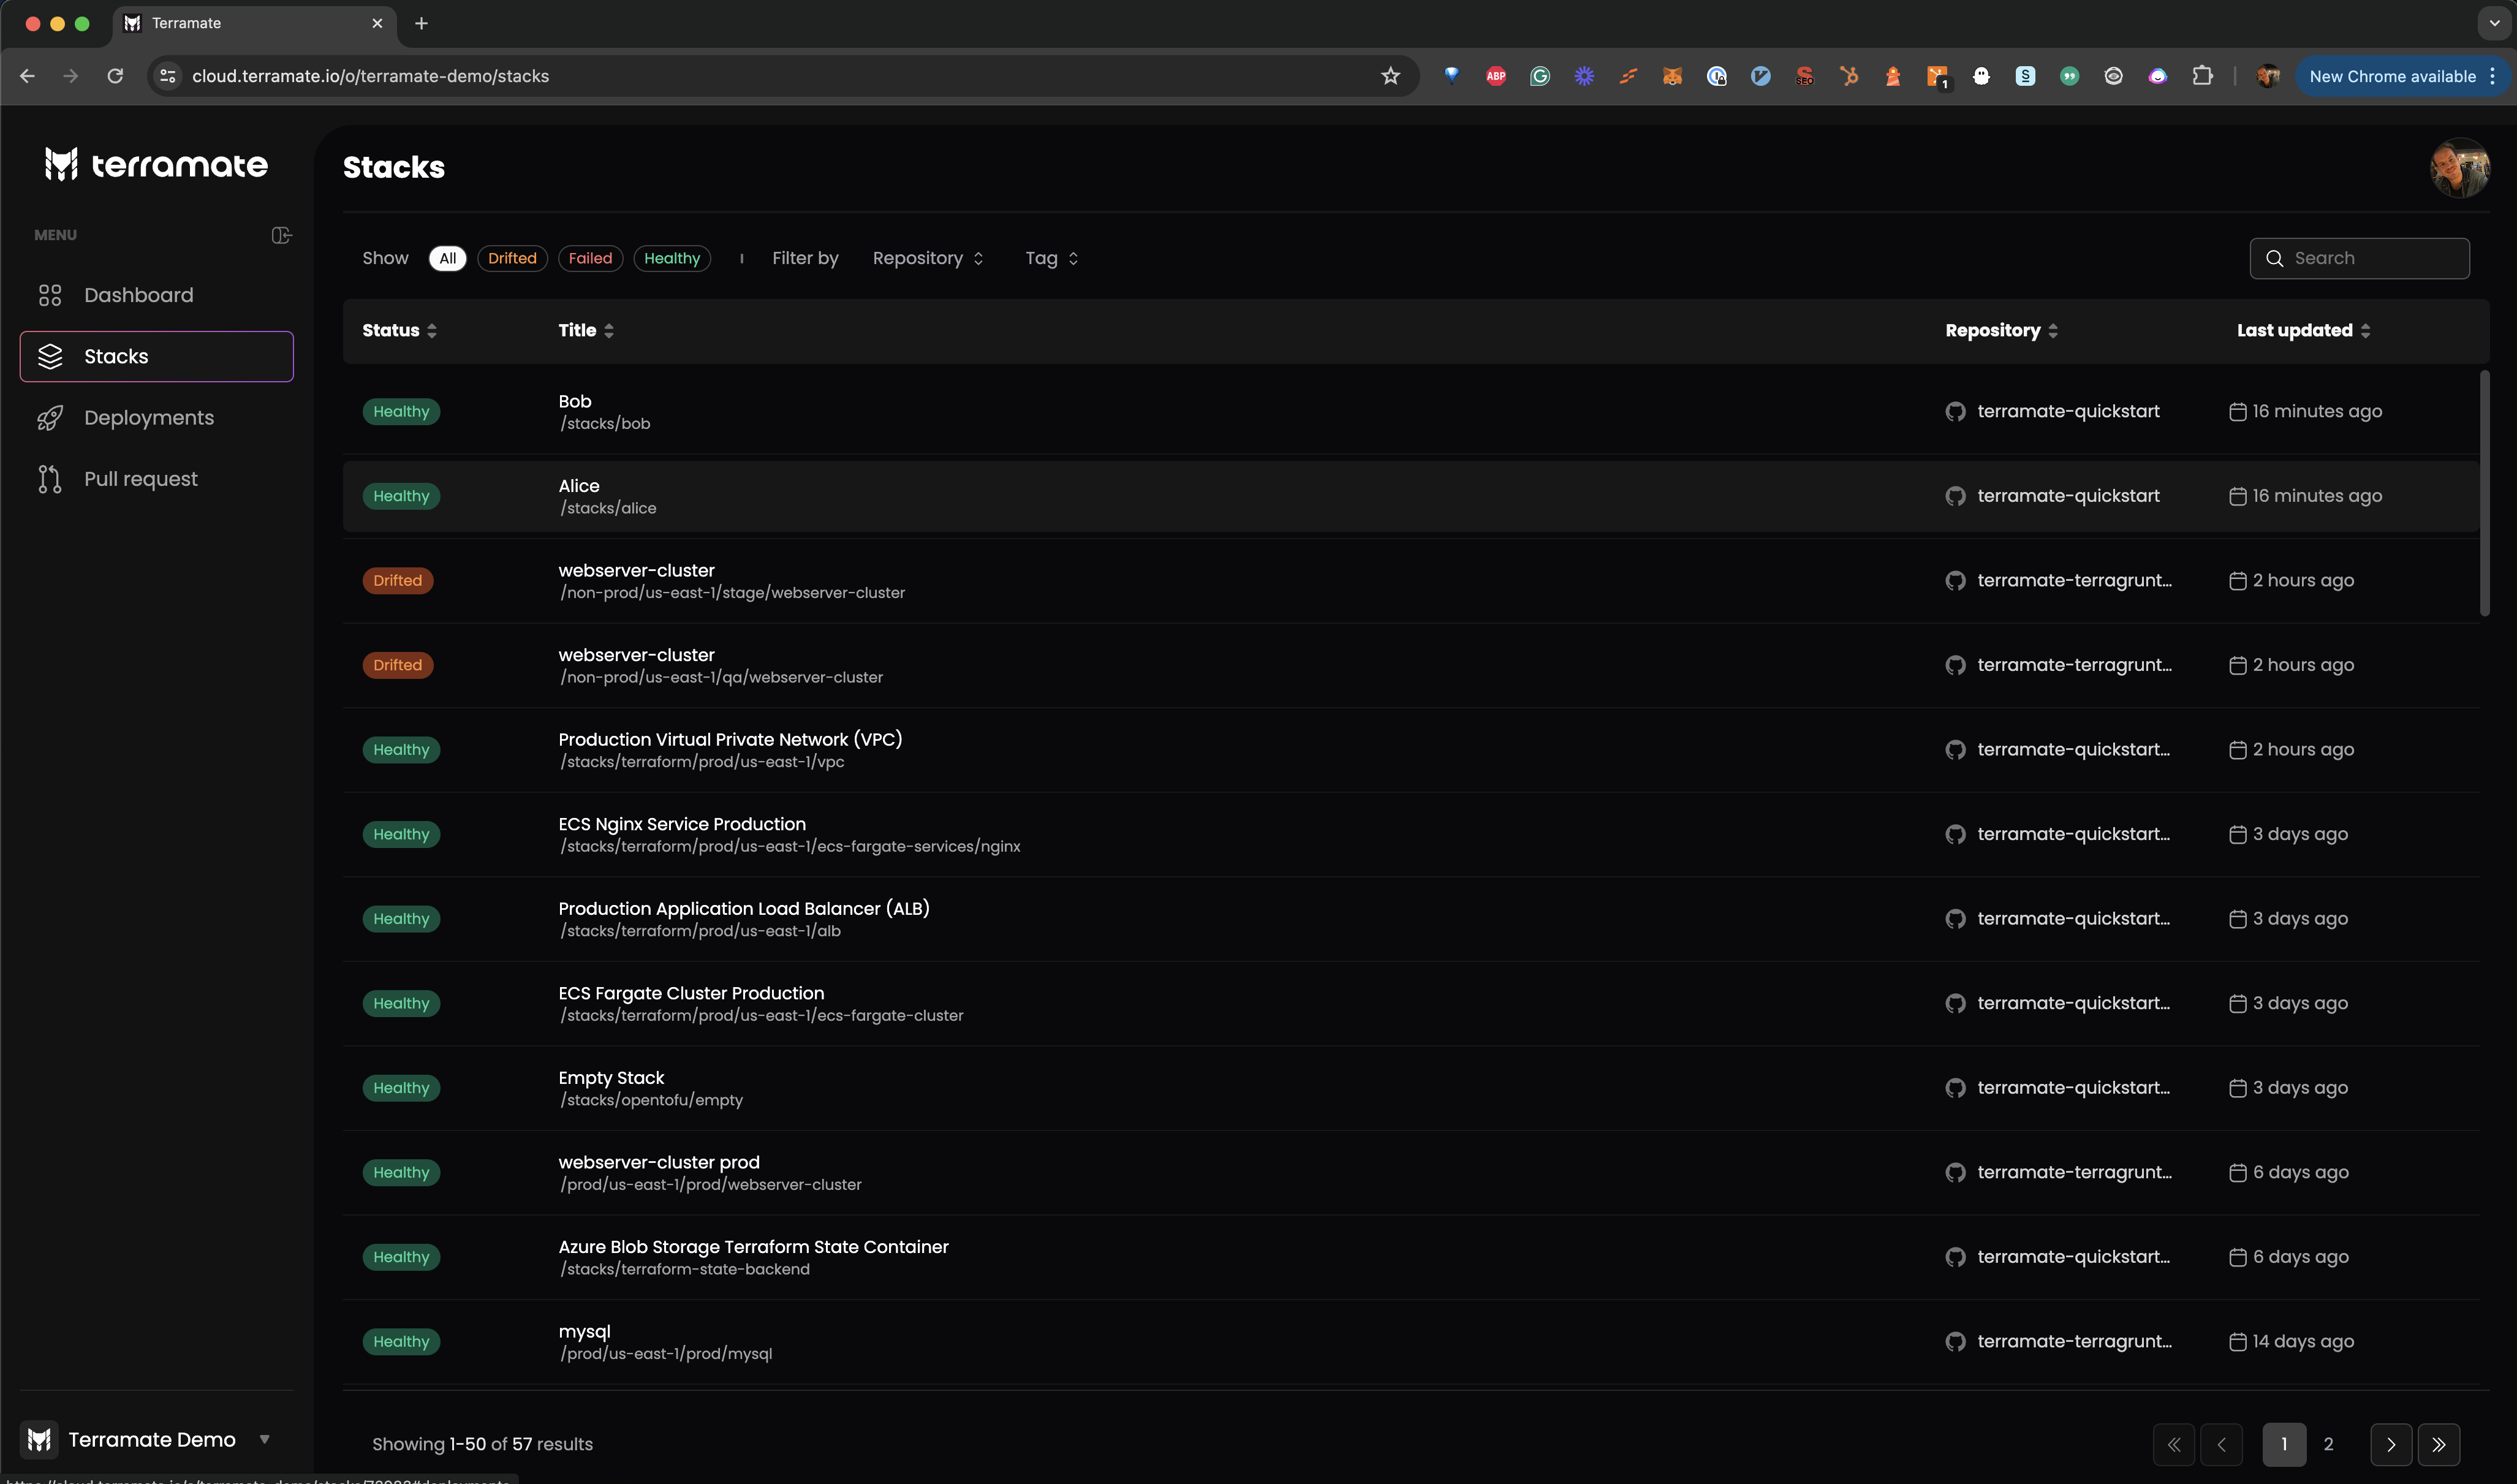
After setting up your GitHub repository and Terramate Cloud organization, let's sync the stacks configured in our Terramate project to Terramate Cloud. The easiest to sync your stacks is to run a drift detection workflow in all stacks and sync the result to Terramate Cloud:
$ terramate run \
  --sync-drift-status \
  --terraform-plan-file=drift.tfplan \
  --continue-on-error \
  -- \
terraform plan -detailed-exitcode -out drift.tfplan$ terramate run \
--sync-drift-status \
--tofu-plan-file=drift.tfplan \
--continue-on-error \
-- \
tofu plan -detailed-exitcode -out drift.tfplanIn a nutshell, the command above runs a terraform plan or tofu plan in all your stacks and sends the result to Terramate Cloud. Since the plans don't detect any changes, Terramate Cloud won't mark those stacks as drifted but only adds them to your inventory of stacks.
Trigger a deployment
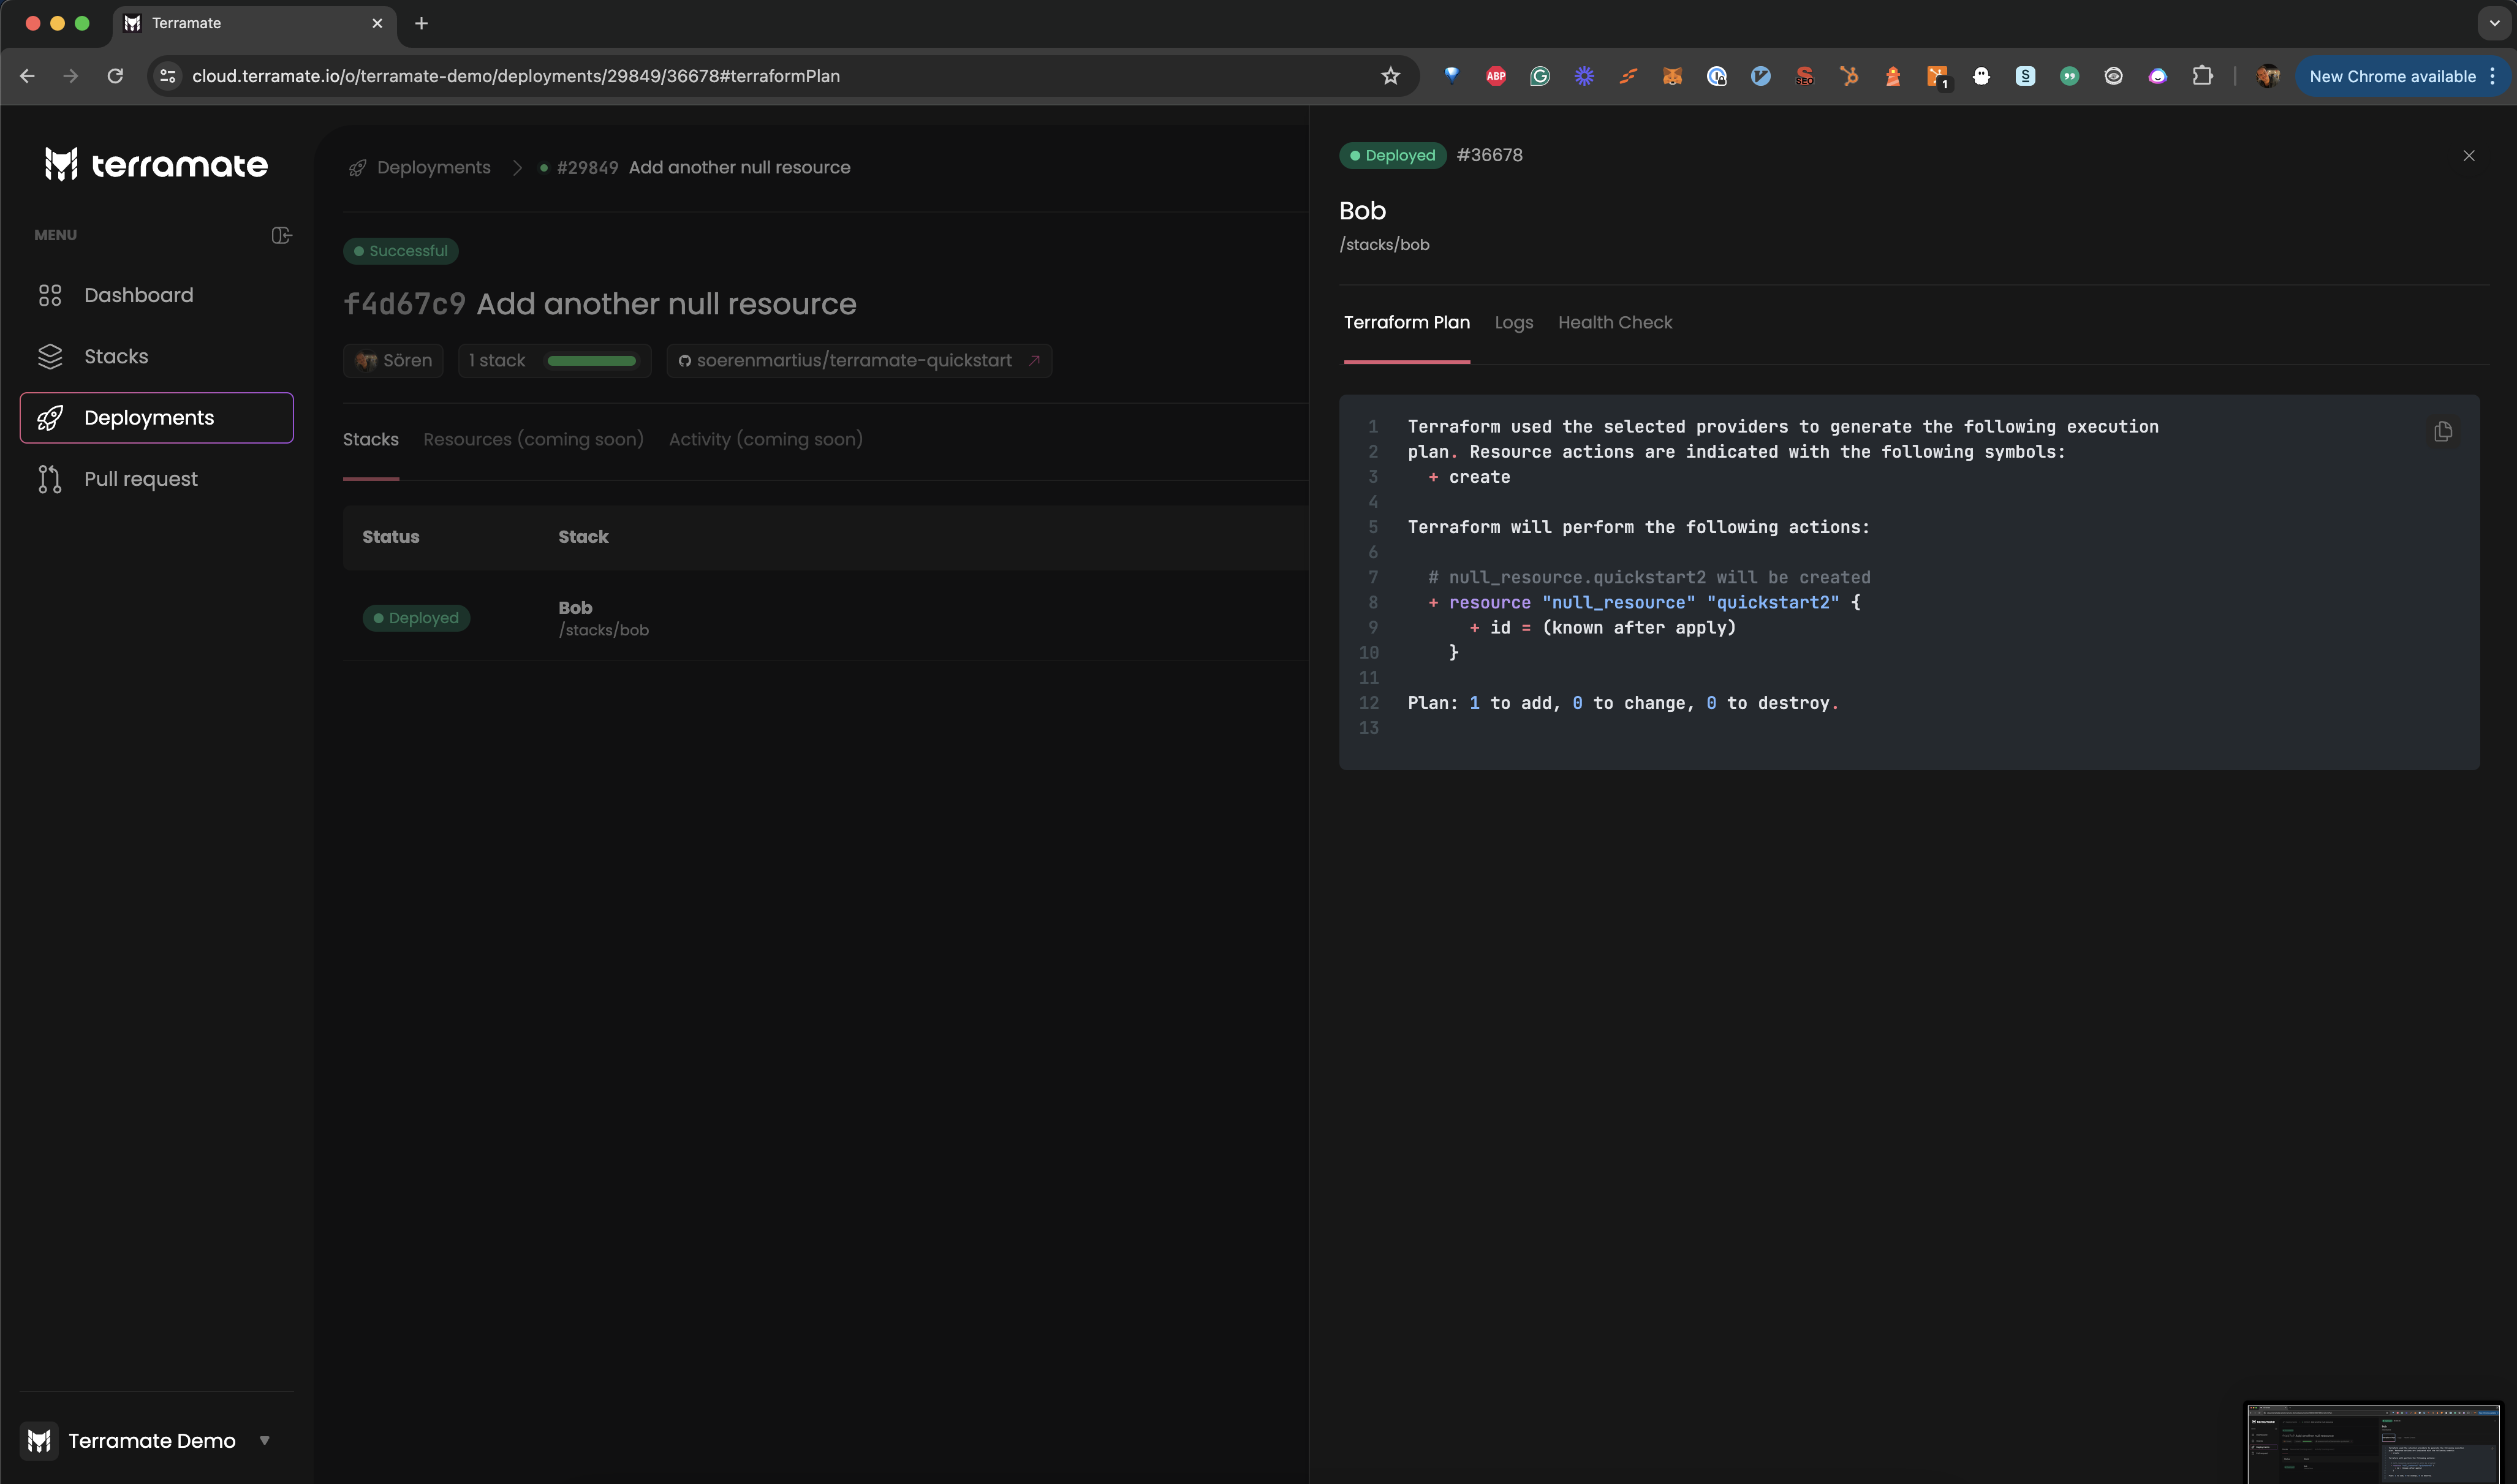
As a final step of this guide, we will change one of our stacks and trigger a new deployment. For that, let's add another null resource to our bob stack.
$ cat <<EOF >>stacks/bob/null.tf
resource "null_resource" "quickstart2" {
}
EOF

$ git add stacks/bob/null.tf
$ git commit -m "Add another null resource"$ cat <<EOF >>stacks/bob/null.tf
resource "null_resource" "quickstart2" {
}
EOF
$ git add stacks/bob/null.tf
$ git commit -m "Add another null resource"
$ git push origin mainNext, plan and apply the changes. The following command will create a plan in all changed stacks and apply the generated plan files and sync the result as a deployment to Terramate Cloud.
$ terramate run \
  --changed \
  -- \
  terraform plan -lock-timeout=5m -out deploy.tfplan

$ terramate run \
  --changed \
  --sync-deployment \
  --terraform-plan-file=deploy.tfplan \
  -- \
terraform apply -input=false -auto-approve -lock-timeout=5m deploy.tfplan$ terramate run \
--changed \
-- \
tofu plan -lock-timeout=5m -out deploy.tfplan
$ terramate run \
--changed \
--sync-deployment \
--tofu-plan-file=deploy.tfplan \
-- \
tofu apply -input=false -auto-approve -lock-timeout=5m deploy.tfplanA new deployment has started in Terramate Cloud. Check out the Deployments section to see it.
Summary
We hope this tutorial has helped you grasp the basics of Terramate. Here's a summary of what we learned:
- How to initialize a Terramate Project in a Git repository.
- How to create stacks.
- How to leverage change detection when managing stacks or running commands.
- How to generate code in all stacks to keep the configuration DRY.
- How to deploy Terraform and OpenTofu using a local backend and null resources as an example.
- How to create a Terramate Cloud account and connect it to your project.
Those examples hopefully give you a starting point and help you get insights into the capabilities of Terramate. This quickstart is just the tip of the iceberg. Running code generation and change detection can help you save a lot of time when maintaining or running Terraform.
Next steps
- Configure CI/CD workflows for pull request previews, deployment, drift detection and reconciliation using GitHub Actions, GitLab, BitBucket pipeline or any other CI/CD platform.
- Configure Slack Notifications.
- Invite your team members to your organization.
Join the community
If you have questions or feature requests regarding Terramate, we encourage you to join our Discord Community where we host regular events such as weekly Office hours. It's an excellent place to contact our team and fellow community members if you have questions regarding Terramate. Alternatively, you can also create an issue in the Github repository.