)
)
)
)
Explore how Terramate can uplift your IaC projects with a free trial or personalized demo.
In our previous blog posts, we discussed why enabling Developer self-service with Infrastructure-as-Code often doesn’t work and how Terramate Catalyst is reimagining Infrastructure-as-Code (IaC) self-service.
In this post, we will explore the technical capabilities of Terramate Catalyst hands-on by working through different examples. At the end of this guide, Platform Engineers will know how to use Terramate Catalyst to enable developers to deploy AWS services, such as S3 or ECS, in self-service using existing Terraform modules.
If you prefer, you can take a look at the final result of this guide in the terramate-catalyst-examples repository on GitHub.
How Catalyst Works Under the Hood
Before we start writing some code, let’s learn about the basics of Catalyst.
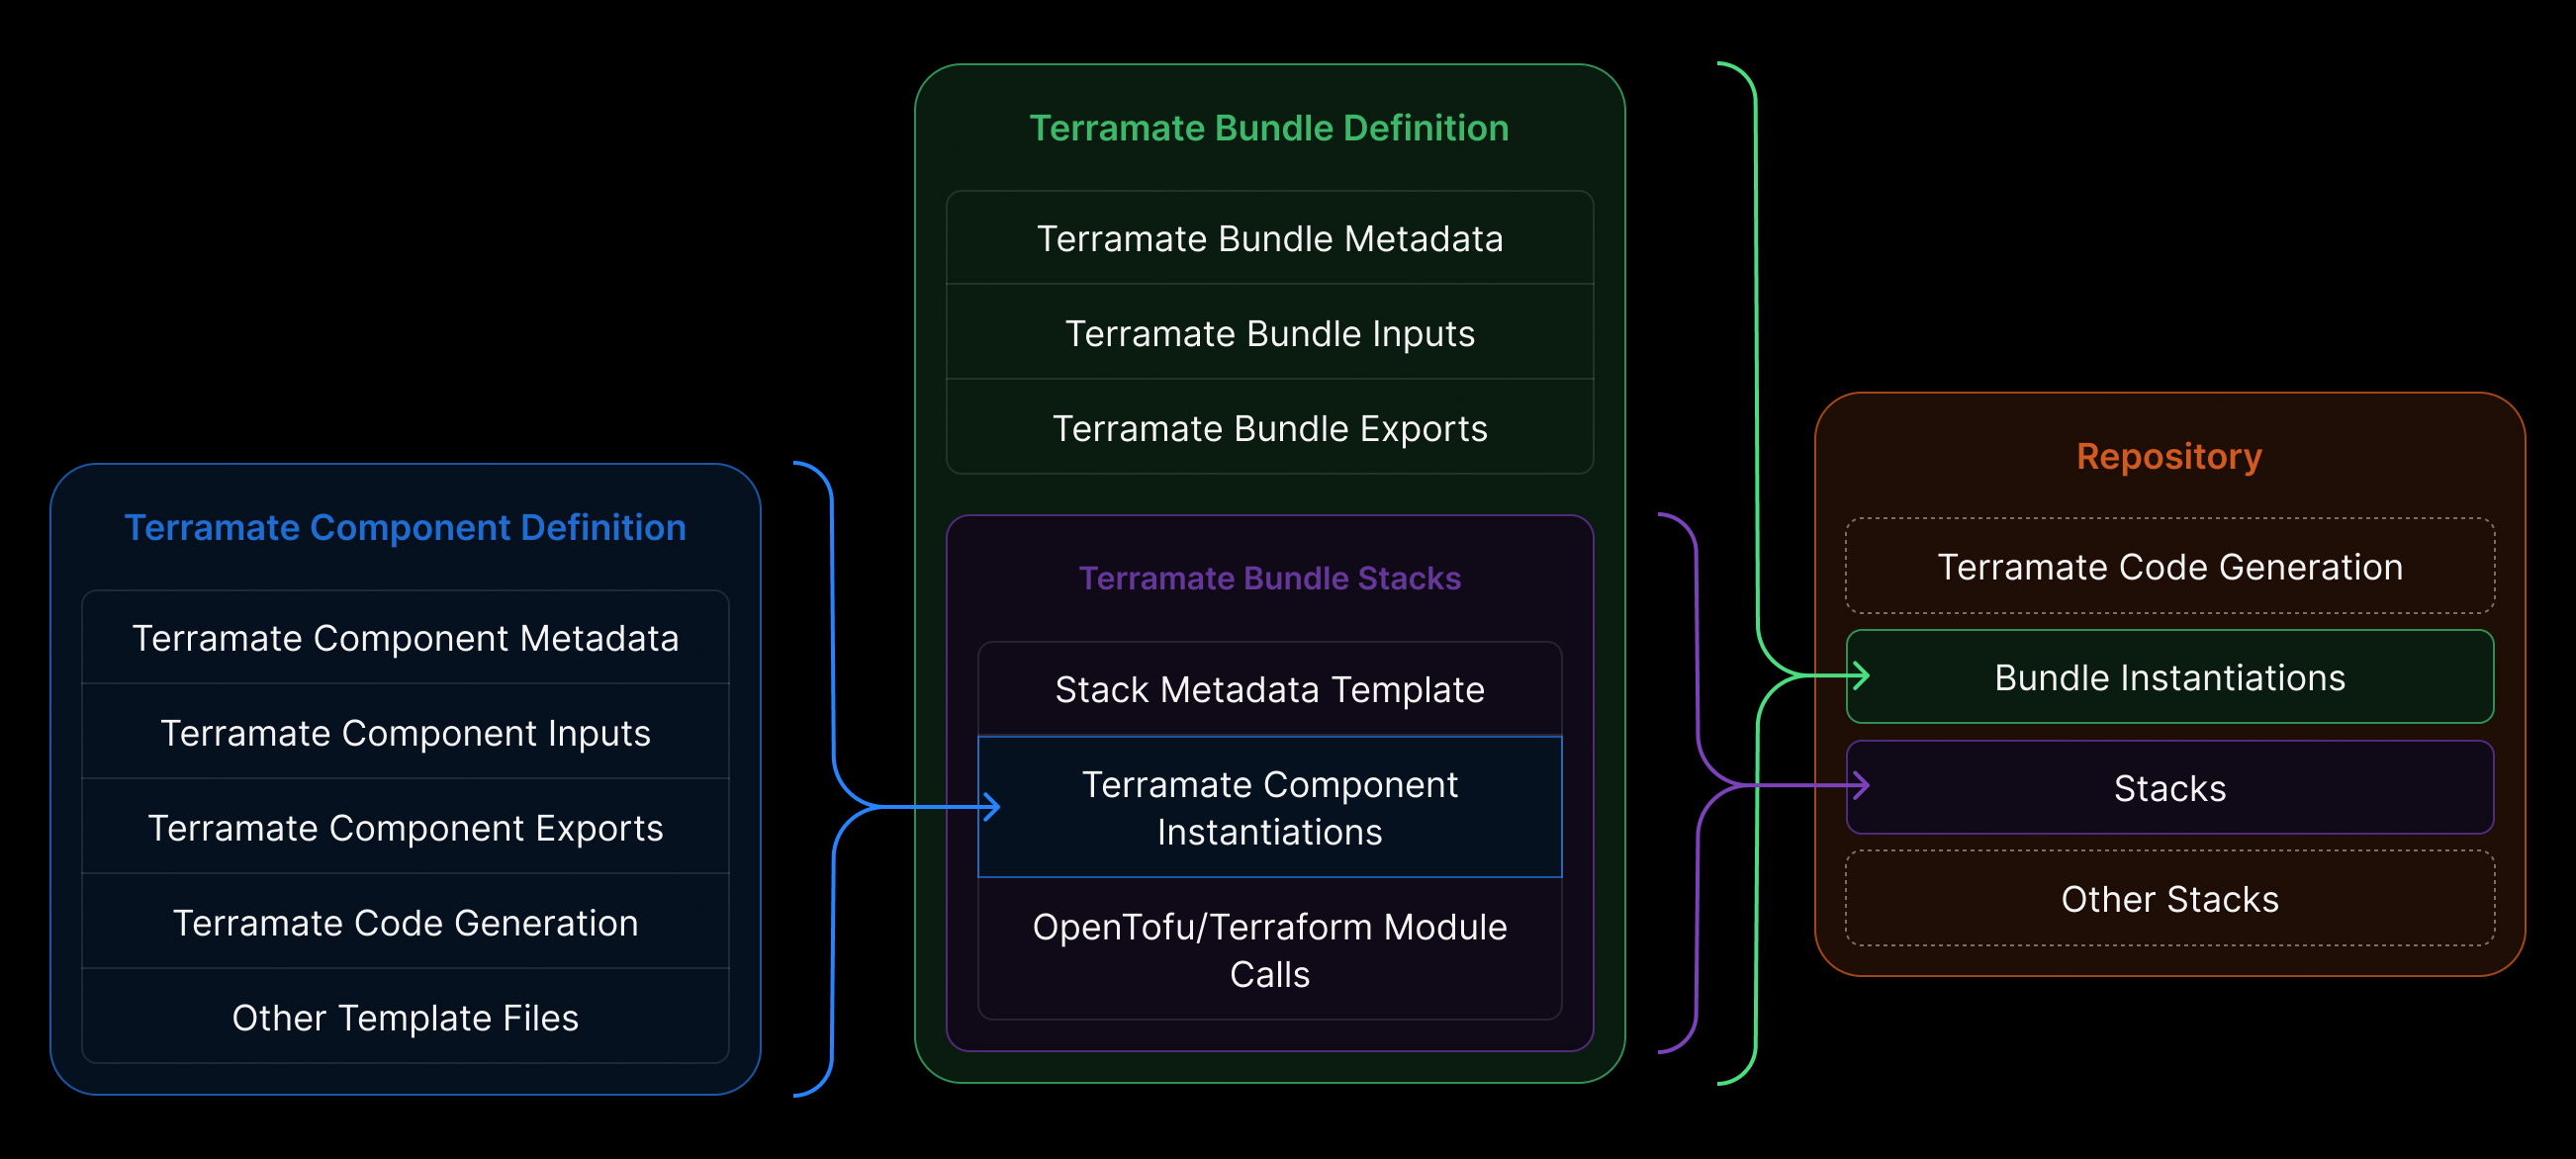
At its core, Catalyst transforms how infrastructure is delivered and consumed inside organizations by introducing two new primitives: Bundles and Components.
Components
Components are reusable, opinionated infrastructure blueprints — defined by platform engineers. They encode organizational standards, governance rules, naming conventions, security policies, cost controls, and so on. In practice, a Component may represent a “database setup,” “message queue,” “VPC,” “cache cluster,” or any other infrastructure pattern. Also, Components can be any arbitrary IaC. E.g., you can define a bunch of Terraform and OpenTofu resources in a Component, use Terraform modules, or any other IaC, such as Kubernetes manifests. The idea of Components is to provide infrastructure patterns that can be reused by platform engineers and sourced by a single or multiple Bundles.
Bundles
Bundles assemble one or more Components into ready-to-use, deployable units. These are what developers and AI agents consume when requesting infrastructure. Bundles abstract away all the complexity: no need to write Terraform, manage state, or deal with providers — you declare what you need (e.g., “a database for service X in environment Y”). Catalyst fills in the rest. Bundles are meant as a unit of reuse for application developers, who aren’t experts in IaC.
Division of responsibilities
This separation creates a clear division of responsibility:
- Platform Engineers design and maintain infrastructure logic, compliance, scalability, and IaC best practices.
- Developers (or AI agents) request infrastructure via simple, high-level abstractions — without needing to understand Terraform, module variables, or backend configuration.
In other words: Catalyst doesn’t replace IaC — it operationalizes it and elegantly hides the complexity for non-expert infrastructure “consumers”.
Ease of onboarding
When evaluating new tools like Terramate Catalyst, one of the first questions is often: “How easy is it to onboard Catalyst into my existing setup?” Catalyst adds an additional layer on top of existing infrastructure-as-code assets—such as Terraform/OpenTofu modules, Kubernetes manifests, and more.
To make onboarding as seamless as possible, Terramate Catalyst includes helper commands that let you import existing IaC as bundles and components.
For example, running terramate component create inside an existing Terraform or OpenTofu module will automatically generate all the required Catalyst configuration—without you having to write a single line of code.
A key part of Catalyst’s value proposition is that it allows teams to reuse their existing IaC setups and quickly turn them into a self-service infrastructure vending machine.
Versioning of Bundles and Components
Both Components and Bundles can be managed and versioned in Git repositories and in the upcoming Terramate Registry using semantic versioning. If you use the registry, Terramate Cloud provides a dashboard to track Bundle and Component usage, as well as versions across multiple repositories and teams.
Scaffold complex IaC
Catalyst basically works by scaffolding the entire IaC stack, including state configuration and providers, but it doesn’t require developers to know, e.g., Terraform, OpenTofu, or their configuration language, HCL. Developers can either use the terramate scaffold command to choose from Bundles available in the current repository, a remote repository, or the upcoming registry in Terramate Cloud. Alternatively, you may use any of the other existing approaches, such as the Terramate MCP Server.
Getting Started: Installing Terramate Catalyst
Terramate Catalyst is part of the open-source Terramate CLI.
Install Catalyst
The easiest way to install Catalyst is via the asdf package manager:
asdf plugin add terramate
asdf set -u terramate 0.16.0
Or just install via brew:
brew install terramateFor other installation methods (Ubuntu/Debian, Fedora/CentOS, Windows, Docker, Go, etc.), see the Terramate CLI installation documentation.
Clone the examples repo
To follow along with the examples in this post, clone the repository locally:
git clone git@github.com:terramate-io/terramate-catalyst-examples.gitWith Catalyst installed and the examples repository ready, let’s walk through a few scenarios to see how Catalyst works under the hood.
Example: Enable Developers to create an S3 Bucket in self-service
In this example, we focus on a simple use case. Allowing developers to deploy a simple S3 bucket by defining its name and ACL only, and without ever touching Terraform or OpenTofu.
By looking at the AWS S3 component in components/example.com/terramate-aws-s3-bucket/v1 you can see three files: component.tm.hcl , inputs.tm.hcl and main.tf.tmgen .
While you can also configure everything needed for a component to function in a single file, we highly recommend separating the configuration for readability. Let's look at each configuration in detail.
component.tm.hcl
define component metadata {
  class   = "example.com/tf-aws-s3/v1"
  version = "1.0.0"

  name        = "AWS S3 Bucket Component"
  description = <<-EOF
    Component that allows creating an S3 bucket on AWS with configurable ACL (default: private) and versioning enabled.
  EOF
}
Components can configure metadata such as class, version, name, and description, which help identify components. Components also expose inputs that are similar to Terraform variables.
inputs.tm.hcl
define component {
  input "name" {
    type        = string
    prompt      = "S3 Bucket Name"
    description = "The name of the S3 bucket"
  }

  input "acl" {
    type        = string
    description = "Access Control List (ACL) for the bucket. Valid values: 'private', 'public-read', 'public-read-write', 'aws-exec-read', 'authenticated-read', 'bucket-owner-read', 'bucket-owner-full-control', 'log-delivery-write'"
    default     = "private"
  }

  input "tags" {
    type        = map(string)
    description = "Tags to apply to resources"
    default     = {}
  }
}
Once created and configured, any IaC can be added to a Component. For example, our S3 component uses simple Terramate templates to generate the Terraform configuration for the S3 bucket.
When using Terramate Code Generation, all Terramate functions are available. Additionally, Terramate Catalyst exposes new functions for e.g. querying metadata of Components and Bundles as well as their inputs.
main.tf.tmgen
module "s3_bucket" {
  source  = "terraform-aws-modules/s3-bucket/aws"
  version = "5.9.0"

  bucket = component.input.name.value
  acl    = component.input.acl.value

  control_object_ownership = true
  object_ownership         = "ObjectWriter"

  # Disable Block Public Access settings when using public ACLs
  block_public_acls       = !tm_contains(["public-read", "public-read-write"], component.input.acl.value)
  block_public_policy     = !tm_contains(["public-read", "public-read-write"], component.input.acl.value)
  ignore_public_acls      = !tm_contains(["public-read", "public-read-write"], component.input.acl.value)
  restrict_public_buckets = !tm_contains(["public-read", "public-read-write"], component.input.acl.value)

  versioning = {
    enabled = true
  }

  server_side_encryption_configuration = {
    rule = {
      apply_server_side_encryption_by_default = {
        sse_algorithm = "AES256"
      }
    }
  }

  tags = component.input.tags.value
}
You can see that the S3 bucket comes with versioning and encryption enabled by default, which we want to enforce for every bucket we create. Developers can only configure what matters to them, which, in this case, means the name of each bucket and whether it is private or public .
As mentioned earlier, Components are individual units of infrastructure-as-code that are designed to be combined into Bundles. A Component represents one or more infrastructure building blocks, while a Bundle groups one or more Components together and defines how they’re instantiated and managed.
Bundles also capture the operational details — such as where new Bundle instances should be scaffolded in the repository, where state should be stored, and how providers should be configured.
To see this in action, take a look at the S3 bundle located at bundles/example.com/tf-aws-s3/v1. You’ll notice that, similar to a Component, the Bundle is defined through a set of configuration files — including bundle.tm.hcl , inputs.tm.hcl , and stack_s3_bucket.tm.hcl .
bundle.tm.hcl
define bundle metadata {
  class   = "example.com/tf-aws-s3/v1"
  version = "1.0.0"

  name        = "AWS S3 Bucket"
  description = <<-EOF
    Creates and manage a private or public AWS S3 Bucket.

    Amazon Simple Storage Service (Amazon S3) is an object storage service offering industry-leading scalability, data availability, security, and performance.
  EOF
}

define bundle {
  alias = tm_join("-", [tm_slug(bundle.input.name.value), bundle.input.env.value])

  scaffolding {
    path = "/stacks/${bundle.input.env.value}/s3/_bundle_s3_${tm_slug(bundle.input.name.value)}.tm.hcl"
    name = tm_slug(bundle.input.name.value)
  }
}
A few things are happening here. First, we define the Bundle’s metadata — similar to how we configured the Component in the previous section. But if you take a closer look, you’ll see the Bundle configuration does a few additional things as well.
Inside the define bundle scaffolding block, we specify the Bundle’s target path. Each time a user runs terramate scaffold to create a new S3 bucket, Catalyst generates the IaC in a unique directory based on the inputs.
For example, a bucket named terramate-catalyst-example in the dev environment would be scaffolded in stacks/dev/s3/terramate-catalyst-example/ .
inputs.tm.hcl
define bundle {
  input "env" {
    type        = string
    description = <<-EOF
		  The environment to create the S3 bucket in.
		EOF

    # Scaffolding configuration
    prompt = "Environment"
    allowed_values = [
      for k, v in global.environments : { name = v, value = k }
    ]
    required_for_scaffold = true
    multiselect           = false
  }

  input "name" {
    type        = string
    description = "A globally unique name of the S3 bucket"

    # Scaffolding configuration
    prompt                = "S3 Bucket Name"
    required_for_scaffold = true
  }

  input "visibility" {
    type        = string
    prompt      = "Bucket Visibility"
    description = "Whether the bucket should be private or public"
    default     = "private"
    allowed_values = [
      { name = "Private", value = "private" },
      { name = "Public Read", value = "public-read" },
      { name = "Public Read/Write", value = "public-read-write" }
    ]
  }
}
In inputs.tm.hcl , the Bundle exposes three inputs:
- name — the name of the bucket
- env — the environment to deploy the bucket in, with options
dev,stg, orprd - visibility — the visibility for the bucket with the options
private,public-read, orpublic-write
These are the configuration options exposed to the user and are passed to the Components used by the Bundle.
The goal is to keep the interface focused: users only see the inputs that matter for their workflow, instead of being overwhelmed by dozens of configuration options — a common issue with many public Terraform modules.
stack_s3_bucket.tm.hcl
define bundle stack "s3-bucket" {
  metadata {
    path = tm_slug(bundle.input.name.value)

    name        = "AWS S3 Bucket ${bundle.input.name.value}"
    description = <<-EOF
      AWS S3 Bucket ${bundle.input.name.value}
    EOF

    tags = [
      bundle.class,
      "${bundle.class}/s3-bucket",
    ]
  }

  component "s3-bucket" {
    source = "/components/example.com/terramate-aws-s3-bucket/v1"
    inputs = {
      name        = bundle.input.name.value
      acl         = bundle.input.visibility.value
      bundle_uuid = bundle.uuid
      tags = {
        "example.com/bundle-uuid" = bundle.uuid
      }
    }
  }
}
In stack_s3_bucket.tm.hcl , the Bundle defines the core configuration needed to support both single-stack and multi-stack architectures. This includes orchestration settings, state backend configuration, and provider setup. It also passes inputs from the bundle to the individual components.
To try this example, clone the terramate-catalyst-examples repository (if you haven’t already), then run terramate scaffold from the repository root.
git clone git@github.com:terramate-io/terramate-catalyst-examples.git
cd terramate-catalyst-examples
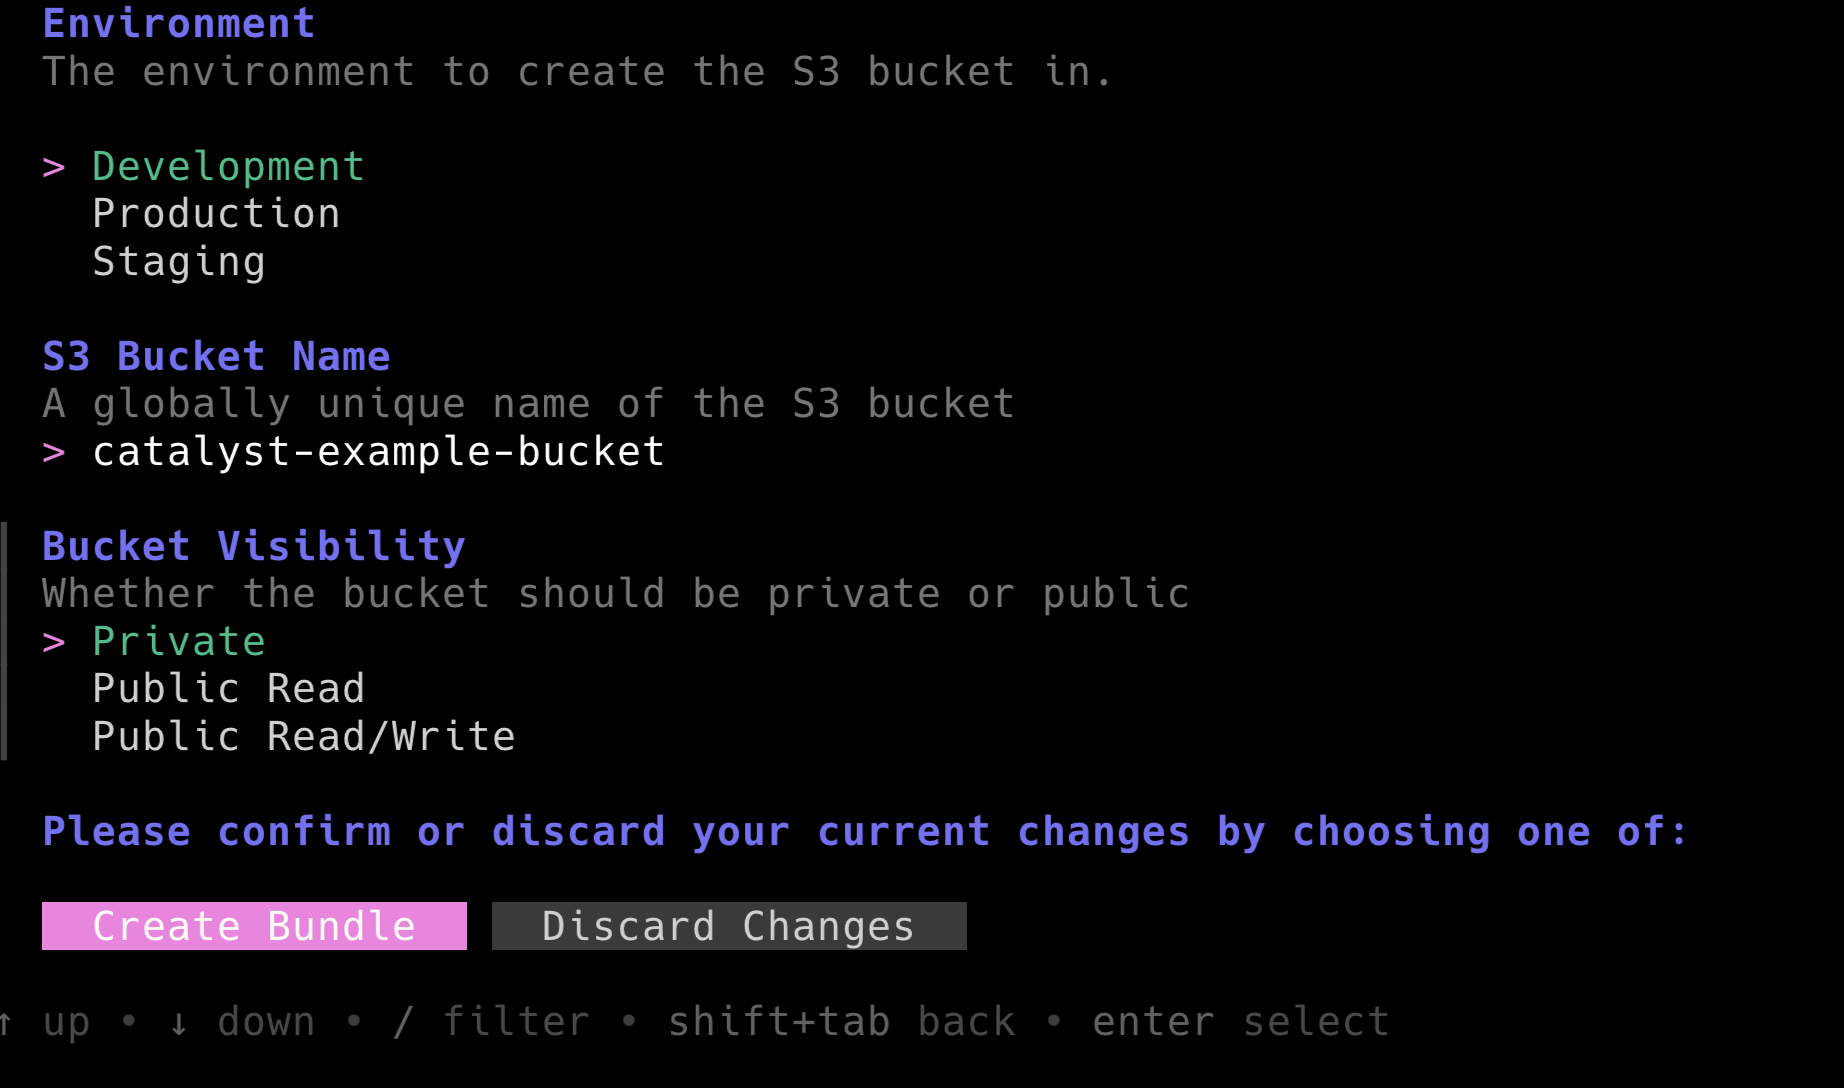
terramate scaffoldWhen you run terramate scaffold, Catalyst shows all available Bundles you can scaffold infrastructure from.s
 Next, choose S3 Bucket and create a new
 private bucket named catalyst-example-bucket in the dev environment.
 Creating a new instance of the S3 Bundle will generate a configuration file at
 stacks/dev/s3/_bundle_s3_catalyst-example-bucket.tm.yml that will look similar to this:
apiVersion: terramate.io/cli/v1
kind: BundleInstance
metadata:
  name: catalyst-example-bucket
  uuid: 86d6e9b1-aad2-4406-9487-c93417911f8e
spec:
  source: /bundles/example.com/tf-aws-s3/v1
  inputs:

    # The environment to create the S3 bucket in.
    env: dev

    # A globally unique name of the S3 bucket
    name: catalyst-example-bucket

    # Whether the bucket should be private or public
    visibility: private
This developer-friendly YAML file contains the configuration for your Bundle instance.
The final step is to generate the required files from this configuration. To do that, run terramate generate to compile the Terraform configuration.
> terramate generate

Code generation report

Successes:

- /stacks/dev/s3/catalyst-example-bucket
	[+] backend.tf
	[+] component_s3-bucket_main.tf
	[+] stack.tm.hcl
	[+] terraform.tf

Hint: '+', '~' and '-' mean the file was created, changed and deleted, respectively.
If you look at the generated component_s3-bucket_main.tf, you’ll see that Catalyst has created the Terraform configuration for deploying a private S3 bucket named catalyst-example-bucket.
The file is generated here: stacks/dev/s3/catalyst-example-bucket/component_s3-bucket_main.tf
component_s3-bucket_main.tf
// TERRAMATE: GENERATED AUTOMATICALLY DO NOT EDIT

module "s3_bucket" {
  acl                      = "private"
  block_public_acls        = true
  block_public_policy      = true
  bucket                   = "catalyst-example-bucket"
  control_object_ownership = true
  ignore_public_acls       = true
  object_ownership         = "ObjectWriter"
  restrict_public_buckets  = true
  server_side_encryption_configuration = {
    rule = {
      apply_server_side_encryption_by_default = {
        sse_algorithm = "AES256"
      }
    }
  }
  source = "terraform-aws-modules/s3-bucket/aws"
  tags = {
    "example.com/bundle-uuid" = "86d6e9b1-aad2-4406-9487-c93417911f8e"
  }
  version = "5.9.0"
  versioning = {
    enabled = true
  }
}
The result is native Terraform code that configures the S3 bucket, providers and Terraform state backend, which can be deployed without further effort using automation workflows.
To deploy the bucket, you can orchestrate the terraform apply command using the Terramate Orchestration Engine. Make sure that you have valid AWS credentials configured in our environment.
Initialize the Terraform environment first by orchestrating terraform init .
❯ terramate run -X -- terraform init

terramate: Entering stack in /stacks/dev/s3/catalyst-example-bucket
terramate: Executing command "terraform init"
Initializing the backend...
Initializing modules...
Initializing provider plugins...
- Finding hashicorp/aws versions matching ">= 6.22.0, 6.25.0"...
- Finding hashicorp/null versions matching "3.2.0"...
- Installing hashicorp/aws v6.25.0...
- Installed hashicorp/aws v6.25.0 (signed by HashiCorp)
- Installing hashicorp/null v3.2.0...
- Installed hashicorp/null v3.2.0 (signed by HashiCorp)
Terraform has created a lock file .terraform.lock.hcl to record the provider
selections it made above. Include this file in your version control repository
so that Terraform can guarantee to make the same selections by default when
you run "terraform init" in the future.

Terraform has been successfully initialized!

You may now begin working with Terraform. Try running "terraform plan" to see
any changes that are required for your infrastructure. All Terraform commands
should now work.

If you ever set or change modules or backend configuration for Terraform,
rerun this command to reinitialize your working directory. If you forget, other
commands will detect it and remind you to do so if necessary.
Next, apply the changes by orchestrating terraform apply .
❯ terramate run -X -- terraform apply -auto-approve

terramate: Entering stack in /stacks/dev/s3/catalyst-example-bucket
terramate: Executing command "terraform apply -auto-approve"
module.s3_bucket.data.aws_canonical_user_id.this[0]: Reading...
module.s3_bucket.data.aws_caller_identity.current: Reading...
module.s3_bucket.data.aws_region.current: Reading...
module.s3_bucket.data.aws_partition.current: Reading...
module.s3_bucket.data.aws_region.current: Read complete after 0s [id=us-east-1]
module.s3_bucket.data.aws_partition.current: Read complete after 0s [id=aws]
module.s3_bucket.data.aws_caller_identity.current: Read complete after 0s [id=975086131449]
module.s3_bucket.data.aws_canonical_user_id.this[0]: Read complete after 1s [id=9da783ff7be6e9971d5ad7ce8956eb03ea19ecbe4c1250ace4ad596753f83e80]

Terraform used the selected providers to generate the following execution plan.
Resource actions are indicated with the following symbols:
  + create

Terraform will perform the following actions:

  # module.s3_bucket.aws_s3_bucket.this[0] will be created
  + resource "aws_s3_bucket" "this" {
      + acceleration_status         = (known after apply)
      + acl                         = (known after apply)
      + arn                         = (known after apply)
      + bucket                      = "catalyst-example-bucket"
      + bucket_domain_name          = (known after apply)
      + bucket_prefix               = (known after apply)
      + bucket_region               = (known after apply)
      + bucket_regional_domain_name = (known after apply)
      + force_destroy               = false
      + hosted_zone_id              = (known after apply)
      + id                          = (known after apply)
      + object_lock_enabled         = false
      + policy                      = (known after apply)
      + region                      = "us-east-1"
      + request_payer               = (known after apply)
      + tags                        = {
          + "example.com/bundle-uuid" = "86d6e9b1-aad2-4406-9487-c93417911f8e"
        }
      + tags_all                    = {
          + "example.com/bundle-uuid" = "86d6e9b1-aad2-4406-9487-c93417911f8e"
        }
      + website_domain              = (known after apply)
      + website_endpoint            = (known after apply)

      + cors_rule (known after apply)

      + grant (known after apply)

      + lifecycle_rule (known after apply)

      + logging (known after apply)

      + object_lock_configuration (known after apply)

      + replication_configuration (known after apply)

      + server_side_encryption_configuration (known after apply)

      + versioning (known after apply)

      + website (known after apply)
    }

  # module.s3_bucket.aws_s3_bucket_acl.this[0] will be created
  + resource "aws_s3_bucket_acl" "this" {
      + acl    = "private"
      + bucket = (known after apply)
      + id     = (known after apply)
      + region = "us-east-1"

      + access_control_policy (known after apply)
    }

  # module.s3_bucket.aws_s3_bucket_ownership_controls.this[0] will be created
  + resource "aws_s3_bucket_ownership_controls" "this" {
      + bucket = (known after apply)
      + id     = (known after apply)
      + region = "us-east-1"

      + rule {
          + object_ownership = "ObjectWriter"
        }
    }

  # module.s3_bucket.aws_s3_bucket_public_access_block.this[0] will be created
  + resource "aws_s3_bucket_public_access_block" "this" {
      + block_public_acls       = true
      + block_public_policy     = true
      + bucket                  = (known after apply)
      + id                      = (known after apply)
      + ignore_public_acls      = true
      + region                  = "us-east-1"
      + restrict_public_buckets = true
      + skip_destroy            = true
    }

  # module.s3_bucket.aws_s3_bucket_server_side_encryption_configuration.this[0] will be created
  + resource "aws_s3_bucket_server_side_encryption_configuration" "this" {
      + bucket = (known after apply)
      + id     = (known after apply)
      + region = "us-east-1"

      + rule {
          + blocked_encryption_types = []

          + apply_server_side_encryption_by_default {
              + sse_algorithm     = "AES256"
                # (1 unchanged attribute hidden)
            }
        }
    }

  # module.s3_bucket.aws_s3_bucket_versioning.this[0] will be created
  + resource "aws_s3_bucket_versioning" "this" {
      + bucket = (known after apply)
      + id     = (known after apply)
      + region = "us-east-1"

      + versioning_configuration {
          + mfa_delete = (known after apply)
          + status     = "Enabled"
        }
    }

Plan: 6 to add, 0 to change, 0 to destroy.
module.s3_bucket.aws_s3_bucket.this[0]: Creating...
module.s3_bucket.aws_s3_bucket.this[0]: Creation complete after 7s [id=catalyst-example-bucket]
module.s3_bucket.aws_s3_bucket_public_access_block.this[0]: Creating...
module.s3_bucket.aws_s3_bucket_versioning.this[0]: Creating...
module.s3_bucket.aws_s3_bucket_server_side_encryption_configuration.this[0]: Creating...
module.s3_bucket.aws_s3_bucket_public_access_block.this[0]: Creation complete after 2s [id=catalyst-example-bucket]
module.s3_bucket.aws_s3_bucket_ownership_controls.this[0]: Creating...
module.s3_bucket.aws_s3_bucket_server_side_encryption_configuration.this[0]: Creation complete after 2s [id=catalyst-example-bucket]
module.s3_bucket.aws_s3_bucket_versioning.this[0]: Creation complete after 3s [id=catalyst-example-bucket]
module.s3_bucket.aws_s3_bucket_ownership_controls.this[0]: Creation complete after 1s [id=catalyst-example-bucket]
module.s3_bucket.aws_s3_bucket_acl.this[0]: Creating...
module.s3_bucket.aws_s3_bucket_acl.this[0]: Creation complete after 1s [id=catalyst-example-bucket,private]

Apply complete! Resources: 6 added, 0 changed, 0 destroyed.
That’s it — you now have a self-service golden path for deploying AWS S3 buckets, making it easy for developers to provision infrastructure safely and consistently.
Example: Reconfigure the S3 Bucket to be public instead of private
But how about if a developer wants to change an existing S3 bucket created with Terramate Catalyst? It’s dead simple: just open the _bundle_s3_catalyst-example-bucket.tm.yml file in stacks/dev/s3/_bundle_s3_catalyst-example-bucket.tm.yml and change the visibility attribute from private to public-read .
_bundle_s3_catalyst-example-bucket.tm.yml
apiVersion: terramate.io/cli/v1
kind: BundleInstance
metadata:
  name: catalyst-example-bucket
  uuid: 86d6e9b1-aad2-4406-9487-c93417911f8e
spec:
  source: /bundles/example.com/tf-aws-s3/v1
  inputs:

    # The environment to create the S3 bucket in.
    env: dev

    # A globally unique name of the S3 bucket
    name: catalyst-example-bucket

    # Whether the bucket should be private or public
    visibility: public-read
Afterwards, run terramate generate again to regenerate the Terraform configuration.
❯ terramate generate
Code generation report

Successes:

- /stacks/dev/s3/catalyst-example-bucket
        [~] component_s3-bucket_main.tf

Hint: '+', '~' and '-' mean the file was created, changed and deleted, respectively.
You can see how only the component_s3-bucket_main.tf is generated again to reflect the updated configuration.
component_s3-bucket_main.tf
// TERRAMATE: GENERATED AUTOMATICALLY DO NOT EDIT

module "s3_bucket" {
  acl                      = "public-read"
  block_public_acls        = false
  block_public_policy      = false
  bucket                   = "catalyst-example-bucket"
  control_object_ownership = true
  ignore_public_acls       = false
  object_ownership         = "ObjectWriter"
  restrict_public_buckets  = false
  server_side_encryption_configuration = {
    rule = {
      apply_server_side_encryption_by_default = {
        sse_algorithm = "AES256"
      }
    }
  }
  source = "terraform-aws-modules/s3-bucket/aws"
  tags = {
    "example.com/bundle-uuid" = "86d6e9b1-aad2-4406-9487-c93417911f8e"
  }
  version = "5.9.0"
  versioning = {
    enabled = true
  }
}
To deploy the changes, simply orchestrate terraform apply again.
❯ terramate run -X -- terraform apply -auto-approve

terramate: Entering stack in /stacks/dev/s3/catalyst-example-bucket
terramate: Executing command "terraform apply -auto-approve"
module.s3_bucket.data.aws_region.current: Reading...
module.s3_bucket.data.aws_canonical_user_id.this[0]: Reading...
module.s3_bucket.data.aws_caller_identity.current: Reading...
module.s3_bucket.data.aws_partition.current: Reading...
module.s3_bucket.data.aws_partition.current: Read complete after 0s [id=aws]
module.s3_bucket.data.aws_region.current: Read complete after 0s [id=us-east-1]
module.s3_bucket.aws_s3_bucket.this[0]: Refreshing state... [id=catalyst-example-bucket]
module.s3_bucket.data.aws_caller_identity.current: Read complete after 0s [id=975086131449]
module.s3_bucket.data.aws_canonical_user_id.this[0]: Read complete after 0s [id=9da783ff7be6e9971d5ad7ce8956eb03ea19ecbe4c1250ace4ad596753f83e80]
module.s3_bucket.aws_s3_bucket_server_side_encryption_configuration.this[0]: Refreshing state... [id=catalyst-example-bucket]
module.s3_bucket.aws_s3_bucket_public_access_block.this[0]: Refreshing state... [id=catalyst-example-bucket]
module.s3_bucket.aws_s3_bucket_versioning.this[0]: Refreshing state... [id=catalyst-example-bucket]
module.s3_bucket.aws_s3_bucket_ownership_controls.this[0]: Refreshing state... [id=catalyst-example-bucket]
module.s3_bucket.aws_s3_bucket_acl.this[0]: Refreshing state... [id=catalyst-example-bucket,private]

Terraform used the selected providers to generate the following execution plan.
Resource actions are indicated with the following symbols:
  ~ update in-place

Terraform will perform the following actions:

  # module.s3_bucket.aws_s3_bucket_acl.this[0] will be updated in-place
  ~ resource "aws_s3_bucket_acl" "this" {
      ~ acl                   = "private" -> "public-read"
        id                    = "catalyst-example-bucket,private"
        # (3 unchanged attributes hidden)

      ~ access_control_policy (known after apply)
      - access_control_policy {
          - grant {
              - permission = "FULL_CONTROL" -> null

              - grantee {
                  - id            = "9da783ff7be6e9971d5ad7ce8956eb03ea19ecbe4c1250ace4ad596753f83e80" -> null
                  - type          = "CanonicalUser" -> null
                    # (3 unchanged attributes hidden)
                }
            }
          - owner {
              - id           = "9da783ff7be6e9971d5ad7ce8956eb03ea19ecbe4c1250ace4ad596753f83e80" -> null
                # (1 unchanged attribute hidden)
            }
        }
    }

  # module.s3_bucket.aws_s3_bucket_public_access_block.this[0] will be updated in-place
  ~ resource "aws_s3_bucket_public_access_block" "this" {
      ~ block_public_acls       = true -> false
      ~ block_public_policy     = true -> false
        id                      = "catalyst-example-bucket"
      ~ ignore_public_acls      = true -> false
      ~ restrict_public_buckets = true -> false
        # (3 unchanged attributes hidden)
    }

Plan: 0 to add, 2 to change, 0 to destroy.
module.s3_bucket.aws_s3_bucket_public_access_block.this[0]: Modifying... [id=catalyst-example-bucket]
module.s3_bucket.aws_s3_bucket_public_access_block.this[0]: Modifications complete after 1s [id=catalyst-example-bucket]
module.s3_bucket.aws_s3_bucket_acl.this[0]: Modifying... [id=catalyst-example-bucket,private]
module.s3_bucket.aws_s3_bucket_acl.this[0]: Modifications complete after 0s [id=catalyst-example-bucket,public-read]

Apply complete! Resources: 0 added, 2 changed, 0 destroyed.
This is how easy it is to update existing infrastructure with Catalyst. As an alternative to editing the YAML file directly, you can run the terramate scaffold reconfigure command, which will guide the developer through the CLI workflow again to reconfigure any existing, instantiated bundles.
Example: Deploy an ECS Cluster with Network and Load Balancer
Next, let's look at a more comprehensive example. For Developers to deploy any container on AWS ECS Fargate, first a cluster needs to exist. But for a production-grade setup a cluster requires an Application Load Balancer (ALB) as well as a Virtual Private Network (VPC). Ideally, those should be deployed using different state files to limit blast radius and execution run-times when applying changes. For that, the example repository comes with three components:
These three reusable components are bundled into the tf-aws-complete-ecs-fargate-cluster Bundle.
This is where things start to become interesting. First, we have dependencies between components. For example, to deploy an Application Load Balancer (ALB), the ALB must know the VPC it should be deployed in. Since both ALB and VPC are managed in different state files, we have to query the VPC and its subnets in the ALB component using Terraform data sources. In Catalyst, this can be achieved very easily without hard-coding values by using tagging strategies that leverage a Bundle's ID across multiple components.
Take a look at the stack_alb.tm.hcl in the tf-aws-complete-ecs-fargate-cluster Bundle to understand how this work.
stack_alb.tm.hcl
define bundle stack "alb" {
  metadata {
    path = "/stacks/${bundle.input.env.value}/ecs-clusters/${tm_slug(bundle.input.name.value)}/alb"

    name        = "AWS ALB ${bundle.input.name.value}"
    description = <<-EOF
      AWS Application Load Balancer ${bundle.input.name.value}
    EOF

    tags = [
      bundle.class,
      "${bundle.class}/alb",
      # "${bundle.class}/ecs-cluster/${bundle.alias}",
      "${bundle.class}/ecs-cluster/${tm_join("-", [tm_slug(bundle.input.name.value), bundle.input.env.value])}",
    ]

    after = [
      "tag:${bundle.class}/vpc",
    ]
  }

  component "alb" {
    source = "/components/example.com/terramate-aws-alb/v1"
    inputs = {
      # name = bundle.alias
      name = tm_join("-", [tm_slug(bundle.input.name.value), bundle.input.env.value])

      # The component will automatically find the VPC and subnets by bundle UUID tag
      vpc_filter_tags = {
        "${bundle.class}/bundle-uuid" = bundle.uuid
      }

      load_balancer_type         = "application"
      enable_deletion_protection = false

      # Default security group rules
      security_group_ingress_rules = {
        all_http = {
          from_port   = 80
          to_port     = 80
          ip_protocol = "tcp"
          cidr_ipv4   = "0.0.0.0/0"
        }
      }

      security_group_egress_rules = {
        all = {
          ip_protocol = "-1"
          cidr_ipv4   = bundle.input.vpc_cidr.value
        }
      }

      # Basic HTTP listener - no routing rules or target groups configured
      # Target groups and listener rules should be added when deploying services
      listeners = {
        http = {
          port     = 80
          protocol = "HTTP"

          # Default response when no target groups are attached
          fixed_response = {
            content_type = "text/plain"
            status_code  = "200"
          }
          rules = {
            for service in tm_bundles("example.com/tf-aws-ecs-fargate-service/v1") :
            service.alias => service.export.listener_rule.value
          }
        }
      }

      target_groups = {
        for service in tm_bundles("example.com/tf-aws-ecs-fargate-service/v1") :
        service.alias => service.export.target_group.value
      }

      tags = {
        "${bundle.class}/bundle-uuid" = bundle.uuid
        # "${bundle.class}/bundle-alias" = bundle.alias
        "${bundle.class}/bundle-alias" = tm_join("-", [tm_slug(bundle.input.name.value), bundle.input.env.value])
      }
    }
  }
}
Not only do we configure the ALB stack to run after the VPC stack for the correct order of execution using Terramate orchestration, but we also do we pass the right Bundle ID to the ALB component:
# The component will automatically find the VPC and subnets by bundle UUID tag
vpc_filter_tags = {
  "${bundle.class}/bundle-uuid" = bundle.uuid
}
As mentioned above, in the ALB components Terraform configuration in main.tf.tm.hcl , we use this input variable to query the correct VPC using data sources.
main.tf.tm.hcl
...

resource "null_resource" "initial_deployment_trigger" {
}

# Look up VPC via AWS data sources by tags (VPC shares the ALB bundle UUID tag)
data "aws_vpc" "vpc_by_tags" {
  tm_dynamic "filter" {
    for_each = component.input.vpc_filter_tags.value
    content {
      name   = "tag:${filter.key}"
      values = [filter.value]
    }
  }

  depends_on = [
    null_resource.initial_deployment_trigger
  ]
}

...
Data sharing across multiple state files is a problem that can usually be solved only by expert users. In Terramate Catalyst, it's elegantly baked in, so that Developers never have to mess around with the complexity of Terraform and OpenTofu.
Take some time to dig through the configurations of the tf-aws-complete-ecs-fargate-cluster Bundle and its components to understand how everything works in detail.
For now, let's demonstrate how easy it is to deploy such a complex setup with Terramate Catalyst. Run terramate scaffold again and select the ECS Cluster bundle from the list of available Bundles.
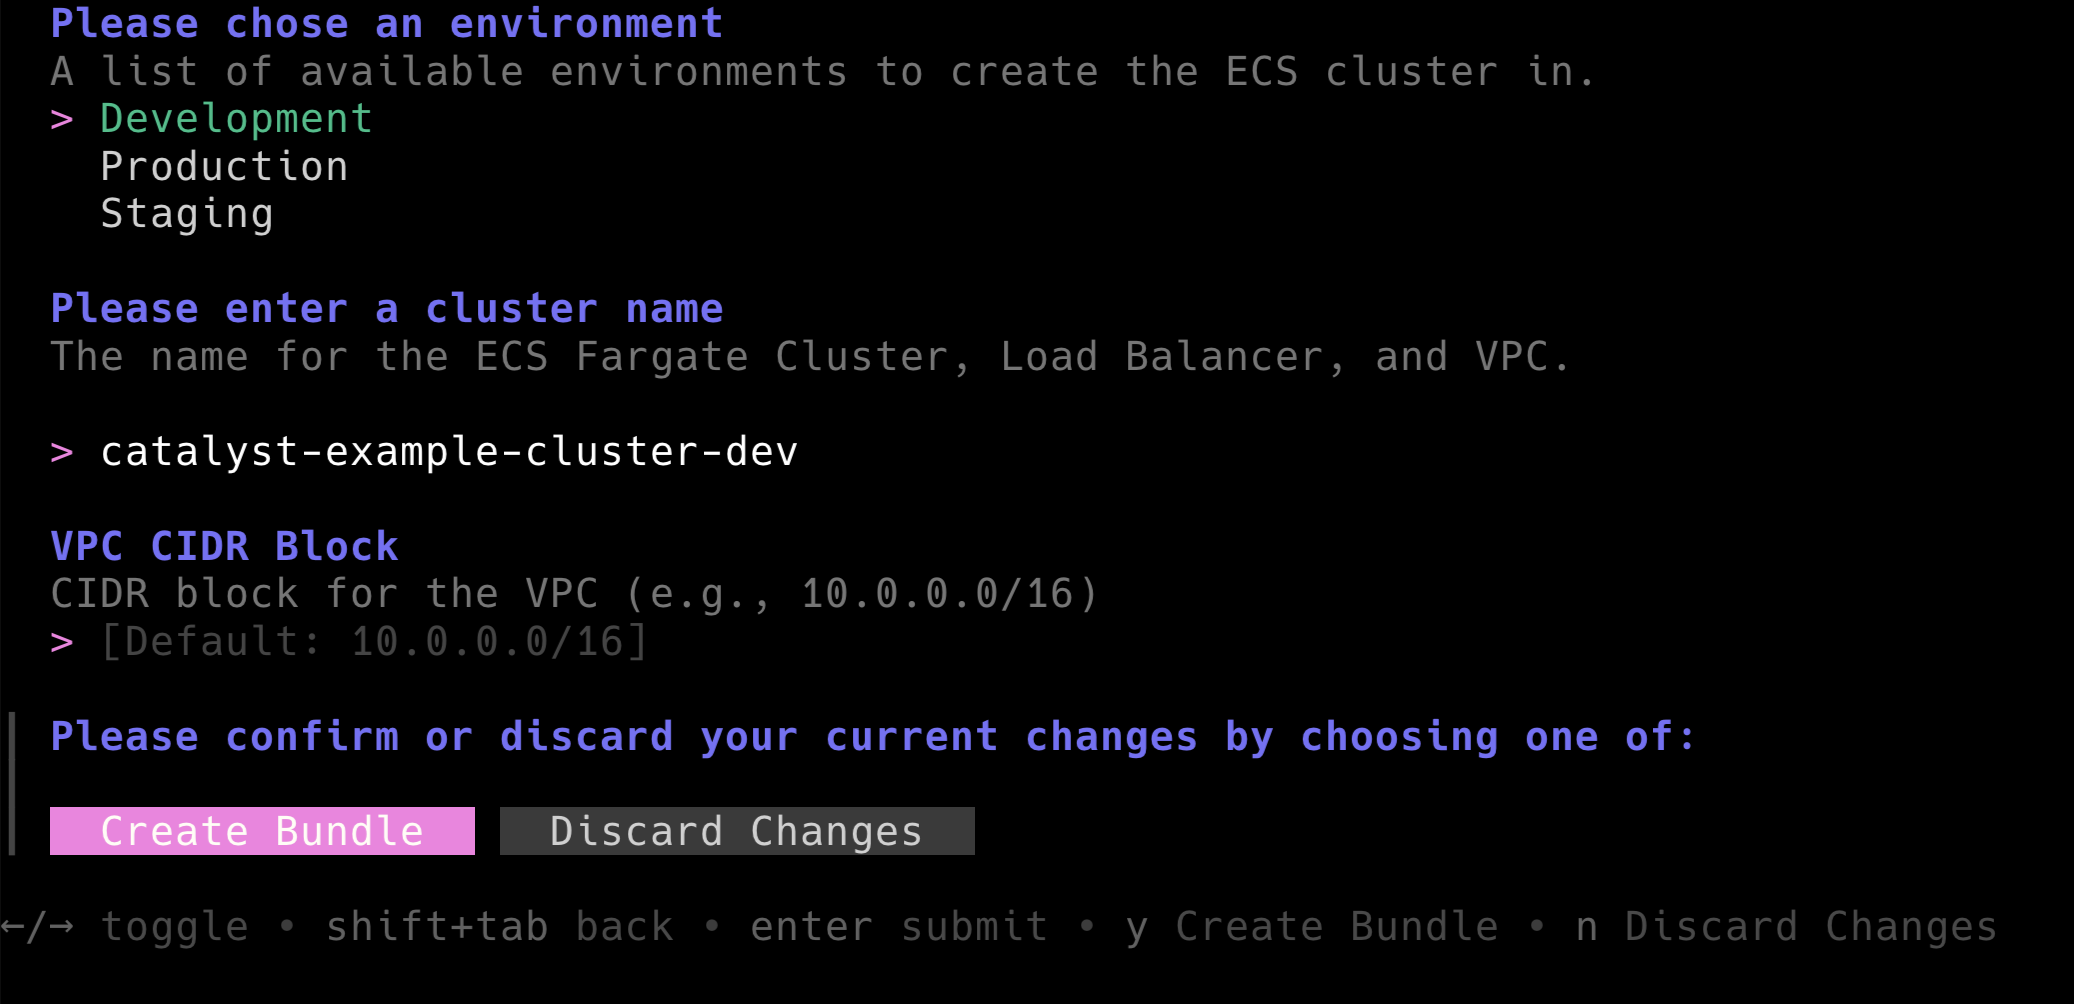 Let's deploy a cluster named
 catalyst-example-cluster-dev in development using the default VPC range. This should create a file catalyst-example-cluster-dev-dev.tm.yml similar to the example below.
apiVersion: terramate.io/cli/v1
kind: BundleInstance
metadata:
  name: catalyst-example-cluster-dev-dev
  uuid: 11ee759d-2862-422f-9bb7-31fb9223930a
spec:
  source: /bundles/example.com/tf-aws-complete-ecs-fargate-cluster/v1
  inputs:

    # A list of available environments to create the ECS cluster in.
    env: dev

    # The name for the ECS Fargate Cluster, Load Balancer, and VPC.
    name: catalyst-example-cluster-dev

    # CIDR block for the VPC (e.g., 10.0.0.0/16)
    vpc_cidr: 10.0.0.0/16
Next, run terramate generate to create all Terramate Stacks and to compile all Terraform code.
> terramate generate

Code generation report

Successes:

- /stacks/dev/ecs-clusters/catalyst-example-cluster-dev/alb
	[+] backend.tf
	[+] component_alb_main.tf
	[+] stack.tm.hcl
	[+] terraform.tf

- /stacks/dev/ecs-clusters/catalyst-example-cluster-dev/cluster
	[+] backend.tf
	[+] component_ecs-cluster_main.tf
	[+] stack.tm.hcl
	[+] terraform.tf

- /stacks/dev/ecs-clusters/catalyst-example-cluster-dev/vpc
	[+] backend.tf
	[+] component_vpc_main.tf
	[+] stack.tm.hcl
	[+] terraform.tf

Hint: '+', '~' and '-' mean the file was created, changed and deleted, respectively.
As you can see, Terramate creates the VPC, ALB and ECS Cluster in separate stacks to separate state. To deploy the resources first initialize the environment by orchestrating terraform init .
> terramate run -X -- terraform init

terramate: Entering stack in /stacks/dev/ecs-clusters/catalyst-example-cluster-dev/cluster
terramate: Executing command "terraform init"
Initializing the backend...
Initializing modules...
Initializing provider plugins...
- Finding hashicorp/aws versions matching ">= 6.4.0, 6.25.0"...
- Finding hashicorp/null versions matching "3.2.0"...
- Installing hashicorp/aws v6.25.0...
- Installed hashicorp/aws v6.25.0 (signed by HashiCorp)
- Installing hashicorp/null v3.2.0...
- Installed hashicorp/null v3.2.0 (signed by HashiCorp)
Terraform has created a lock file .terraform.lock.hcl to record the provider
selections it made above. Include this file in your version control repository
so that Terraform can guarantee to make the same selections by default when
you run "terraform init" in the future.

Terraform has been successfully initialized!

You may now begin working with Terraform. Try running "terraform plan" to see
any changes that are required for your infrastructure. All Terraform commands
should now work.

If you ever set or change modules or backend configuration for Terraform,
rerun this command to reinitialize your working directory. If you forget, other
commands will detect it and remind you to do so if necessary.
terramate: Entering stack in /stacks/dev/ecs-clusters/catalyst-example-cluster-dev/vpc
terramate: Executing command "terraform init"
Initializing the backend...

Successfully configured the backend "local"! Terraform will automatically
use this backend unless the backend configuration changes.
Initializing modules...
Downloading registry.terraform.io/terraform-aws-modules/vpc/aws 6.5.1 for vpc...
- vpc in .terraform/modules/vpc
Initializing provider plugins...
- Finding hashicorp/aws versions matching ">= 6.0.0, 6.25.0"...
- Finding hashicorp/null versions matching "3.2.0"...
- Installing hashicorp/aws v6.25.0...
- Installed hashicorp/aws v6.25.0 (signed by HashiCorp)
- Installing hashicorp/null v3.2.0...
- Installed hashicorp/null v3.2.0 (signed by HashiCorp)
Terraform has created a lock file .terraform.lock.hcl to record the provider
selections it made above. Include this file in your version control repository
so that Terraform can guarantee to make the same selections by default when
you run "terraform init" in the future.

Terraform has been successfully initialized!

You may now begin working with Terraform. Try running "terraform plan" to see
any changes that are required for your infrastructure. All Terraform commands
should now work.

If you ever set or change modules or backend configuration for Terraform,
rerun this command to reinitialize your working directory. If you forget, other
commands will detect it and remind you to do so if necessary.
terramate: Entering stack in /stacks/dev/s3/catalyst-example-bucket
terramate: Executing command "terraform init"
Initializing the backend...
Initializing modules...
Initializing provider plugins...
- Reusing previous version of hashicorp/null from the dependency lock file
- Reusing previous version of hashicorp/aws from the dependency lock file
- Using previously-installed hashicorp/null v3.2.0
- Using previously-installed hashicorp/aws v6.25.0

Terraform has been successfully initialized!

You may now begin working with Terraform. Try running "terraform plan" to see
any changes that are required for your infrastructure. All Terraform commands
should now work.

If you ever set or change modules or backend configuration for Terraform,
rerun this command to reinitialize your working directory. If you forget, other
commands will detect it and remind you to do so if necessary.
terramate: Entering stack in /stacks/dev/ecs-clusters/catalyst-example-cluster-dev/alb
terramate: Executing command "terraform init"
Initializing the backend...

Successfully configured the backend "local"! Terraform will automatically
use this backend unless the backend configuration changes.
Initializing modules...
Downloading registry.terraform.io/terraform-aws-modules/alb/aws 10.4.0 for alb...
- alb in .terraform/modules/alb
Initializing provider plugins...
- Finding hashicorp/null versions matching "3.2.0"...
- Finding hashicorp/aws versions matching ">= 6.25.0, 6.25.0"...
- Installing hashicorp/aws v6.25.0...
- Installed hashicorp/aws v6.25.0 (signed by HashiCorp)
- Installing hashicorp/null v3.2.0...
- Installed hashicorp/null v3.2.0 (signed by HashiCorp)
Terraform has created a lock file .terraform.lock.hcl to record the provider
selections it made above. Include this file in your version control repository
so that Terraform can guarantee to make the same selections by default when
you run "terraform init" in the future.

Terraform has been successfully initialized!

You may now begin working with Terraform. Try running "terraform plan" to see
any changes that are required for your infrastructure. All Terraform commands
should now work.

If you ever set or change modules or backend configuration for Terraform,
rerun this command to reinitialize your working directory. If you forget, other
commands will detect it and remind you to do so if necessary.
Next, orchestrate terraform apply to deploy the resources in AWS.
❯ terramate run -X -- terraform apply -auto-approve
terramate: Entering stack in /stacks/dev/ecs-clusters/catalyst-example-cluster-dev/cluster
terramate: Executing command "terraform apply -auto-approve"
Terraform used the selected providers to generate the following execution plan. Resource actions are indicated with the following symbols:
+ create
Terraform will perform the following actions:
# module.ecs_cluster.module.cluster.aws_cloudwatch_log_group.this[0] will be created
+ resource "aws_cloudwatch_log_group" "this" {
+ arn = (known after apply)
+ deletion_protection_enabled = (known after apply)
+ id = (known after apply)
+ log_group_class = (known after apply)
+ name = "/aws/ecs/catalyst-example-cluster-dev-dev"
+ name_prefix = (known after apply)
+ region = "us-east-1"
+ retention_in_days = 90
+ skip_destroy = false
+ tags = {
+ "Name" = "/aws/ecs/catalyst-example-cluster-dev-dev"
+ "example.com/tf-aws-complete-ecs-fargate-cluster/v1/bundle-alias" = "catalyst-example-cluster-dev-dev"
+ "example.com/tf-aws-complete-ecs-fargate-cluster/v1/bundle-uuid" = "11ee759d-2862-422f-9bb7-31fb9223930a"
}
+ tags_all = {
+ "Name" = "/aws/ecs/catalyst-example-cluster-dev-dev"
+ "example.com/tf-aws-complete-ecs-fargate-cluster/v1/bundle-alias" = "catalyst-example-cluster-dev-dev"
+ "example.com/tf-aws-complete-ecs-fargate-cluster/v1/bundle-uuid" = "11ee759d-2862-422f-9bb7-31fb9223930a"
}
}
# module.ecs_cluster.module.cluster.aws_ecs_cluster.this[0] will be created
+ resource "aws_ecs_cluster" "this" {
+ arn = (known after apply)
+ id = (known after apply)
+ name = "catalyst-example-cluster-dev-dev"
+ region = "us-east-1"
+ tags = {
+ "example.com/tf-aws-complete-ecs-fargate-cluster/v1/bundle-alias" = "catalyst-example-cluster-dev-dev"
+ "example.com/tf-aws-complete-ecs-fargate-cluster/v1/bundle-uuid" = "11ee759d-2862-422f-9bb7-31fb9223930a"
}
+ tags_all = {
+ "example.com/tf-aws-complete-ecs-fargate-cluster/v1/bundle-alias" = "catalyst-example-cluster-dev-dev"
+ "example.com/tf-aws-complete-ecs-fargate-cluster/v1/bundle-uuid" = "11ee759d-2862-422f-9bb7-31fb9223930a"
}
+ configuration {
+ execute_command_configuration {
+ logging = "OVERRIDE"
+ log_configuration {
+ cloud_watch_log_group_name = "/aws/ecs/catalyst-example-cluster-dev-dev"
}
}
}
+ setting {
+ name = "containerInsights"
+ value = "enabled"
}
}
# module.ecs_cluster.module.cluster.aws_ecs_cluster_capacity_providers.this[0] will be created
+ resource "aws_ecs_cluster_capacity_providers" "this" {
+ capacity_providers = [
+ "FARGATE",
+ "FARGATE_SPOT",
]
+ cluster_name = "catalyst-example-cluster-dev-dev"
+ id = (known after apply)
+ region = "us-east-1"
+ default_capacity_provider_strategy {
+ base = 0
+ capacity_provider = "FARGATE_SPOT"
+ weight = 50
}
+ default_capacity_provider_strategy {
+ base = 20
+ capacity_provider = "FARGATE"
+ weight = 50
}
}
Plan: 3 to add, 0 to change, 0 to destroy.
module.ecs_cluster.module.cluster.aws_cloudwatch_log_group.this[0]: Creating...
module.ecs_cluster.module.cluster.aws_cloudwatch_log_group.this[0]: Creation complete after 2s [id=/aws/ecs/catalyst-example-cluster-dev-dev]
module.ecs_cluster.module.cluster.aws_ecs_cluster.this[0]: Creating...
module.ecs_cluster.module.cluster.aws_ecs_cluster.this[0]: Still creating... [00m10s elapsed]
module.ecs_cluster.module.cluster.aws_ecs_cluster.this[0]: Creation complete after 13s [id=arn:aws:ecs:us-east-1:975086131449:cluster/catalyst-example-cluster-dev-dev]
module.ecs_cluster.module.cluster.aws_ecs_cluster_capacity_providers.this[0]: Creating...
module.ecs_cluster.module.cluster.aws_ecs_cluster_capacity_providers.this[0]: Still creating... [00m10s elapsed]
module.ecs_cluster.module.cluster.aws_ecs_cluster_capacity_providers.this[0]: Creation complete after 12s [id=catalyst-example-cluster-dev-dev]
Apply complete! Resources: 3 added, 0 changed, 0 destroyed.
terramate: Entering stack in /stacks/dev/ecs-clusters/catalyst-example-cluster-dev/vpc
terramate: Executing command "terraform apply -auto-approve"
data.aws_availability_zones.available: Reading...
data.aws_availability_zones.available: Read complete after 1s [id=us-east-1]
Terraform used the selected providers to generate the following execution plan. Resource actions are indicated with the following symbols:
+ create
Terraform will perform the following actions:
# module.vpc.aws_default_network_acl.this[0] will be created
+ resource "aws_default_network_acl" "this" {
+ arn = (known after apply)
+ default_network_acl_id = (known after apply)
+ id = (known after apply)
+ owner_id = (known after apply)
+ region = "us-east-1"
+ tags = {
+ "Name" = "catalyst-example-cluster-dev-dev-default"
+ "example.com/tf-aws-complete-ecs-fargate-cluster/v1/bundle-alias" = "catalyst-example-cluster-dev-dev"
+ "example.com/tf-aws-complete-ecs-fargate-cluster/v1/bundle-uuid" = "11ee759d-2862-422f-9bb7-31fb9223930a"
}
+ tags_all = {
+ "Name" = "catalyst-example-cluster-dev-dev-default"
+ "example.com/tf-aws-complete-ecs-fargate-cluster/v1/bundle-alias" = "catalyst-example-cluster-dev-dev"
+ "example.com/tf-aws-complete-ecs-fargate-cluster/v1/bundle-uuid" = "11ee759d-2862-422f-9bb7-31fb9223930a"
}
+ vpc_id = (known after apply)
+ egress {
+ action = "allow"
+ from_port = 0
+ ipv6_cidr_block = "::/0"
+ protocol = "-1"
+ rule_no = 101
+ to_port = 0
# (1 unchanged attribute hidden)
}
+ egress {
+ action = "allow"
+ cidr_block = "0.0.0.0/0"
+ from_port = 0
+ protocol = "-1"
+ rule_no = 100
+ to_port = 0
# (1 unchanged attribute hidden)
}
+ ingress {
+ action = "allow"
+ from_port = 0
+ ipv6_cidr_block = "::/0"
+ protocol = "-1"
+ rule_no = 101
+ to_port = 0
# (1 unchanged attribute hidden)
}
+ ingress {
+ action = "allow"
+ cidr_block = "0.0.0.0/0"
+ from_port = 0
+ protocol = "-1"
+ rule_no = 100
+ to_port = 0
# (1 unchanged attribute hidden)
}
}
# module.vpc.aws_default_route_table.default[0] will be created
+ resource "aws_default_route_table" "default" {
+ arn = (known after apply)
+ default_route_table_id = (known after apply)
+ id = (known after apply)
+ owner_id = (known after apply)
+ region = "us-east-1"
+ route = (known after apply)
+ tags = {
+ "Name" = "catalyst-example-cluster-dev-dev-default"
+ "example.com/tf-aws-complete-ecs-fargate-cluster/v1/bundle-alias" = "catalyst-example-cluster-dev-dev"
+ "example.com/tf-aws-complete-ecs-fargate-cluster/v1/bundle-uuid" = "11ee759d-2862-422f-9bb7-31fb9223930a"
}
+ tags_all = {
+ "Name" = "catalyst-example-cluster-dev-dev-default"
+ "example.com/tf-aws-complete-ecs-fargate-cluster/v1/bundle-alias" = "catalyst-example-cluster-dev-dev"
+ "example.com/tf-aws-complete-ecs-fargate-cluster/v1/bundle-uuid" = "11ee759d-2862-422f-9bb7-31fb9223930a"
}
+ vpc_id = (known after apply)
+ timeouts {
+ create = "5m"
+ update = "5m"
}
}
# module.vpc.aws_default_security_group.this[0] will be created
+ resource "aws_default_security_group" "this" {
+ arn = (known after apply)
+ description = (known after apply)
+ egress = (known after apply)
+ id = (known after apply)
+ ingress = (known after apply)
+ name = (known after apply)
+ name_prefix = (known after apply)
+ owner_id = (known after apply)
+ region = "us-east-1"
+ revoke_rules_on_delete = false
+ tags = {
+ "Name" = "catalyst-example-cluster-dev-dev-default"
+ "example.com/tf-aws-complete-ecs-fargate-cluster/v1/bundle-alias" = "catalyst-example-cluster-dev-dev"
+ "example.com/tf-aws-complete-ecs-fargate-cluster/v1/bundle-uuid" = "11ee759d-2862-422f-9bb7-31fb9223930a"
}
+ tags_all = {
+ "Name" = "catalyst-example-cluster-dev-dev-default"
+ "example.com/tf-aws-complete-ecs-fargate-cluster/v1/bundle-alias" = "catalyst-example-cluster-dev-dev"
+ "example.com/tf-aws-complete-ecs-fargate-cluster/v1/bundle-uuid" = "11ee759d-2862-422f-9bb7-31fb9223930a"
}
+ vpc_id = (known after apply)
}
# module.vpc.aws_eip.nat[0] will be created
+ resource "aws_eip" "nat" {
+ allocation_id = (known after apply)
+ arn = (known after apply)
+ association_id = (known after apply)
+ carrier_ip = (known after apply)
+ customer_owned_ip = (known after apply)
+ domain = "vpc"
+ id = (known after apply)
+ instance = (known after apply)
+ ipam_pool_id = (known after apply)
+ network_border_group = (known after apply)
+ network_interface = (known after apply)
+ private_dns = (known after apply)
+ private_ip = (known after apply)
+ ptr_record = (known after apply)
+ public_dns = (known after apply)
+ public_ip = (known after apply)
+ public_ipv4_pool = (known after apply)
+ region = "us-east-1"
+ tags = {
+ "Name" = "catalyst-example-cluster-dev-dev-us-east-1a"
+ "example.com/tf-aws-complete-ecs-fargate-cluster/v1/bundle-alias" = "catalyst-example-cluster-dev-dev"
+ "example.com/tf-aws-complete-ecs-fargate-cluster/v1/bundle-uuid" = "11ee759d-2862-422f-9bb7-31fb9223930a"
}
+ tags_all = {
+ "Name" = "catalyst-example-cluster-dev-dev-us-east-1a"
+ "example.com/tf-aws-complete-ecs-fargate-cluster/v1/bundle-alias" = "catalyst-example-cluster-dev-dev"
+ "example.com/tf-aws-complete-ecs-fargate-cluster/v1/bundle-uuid" = "11ee759d-2862-422f-9bb7-31fb9223930a"
}
}
# module.vpc.aws_internet_gateway.this[0] will be created
+ resource "aws_internet_gateway" "this" {
+ arn = (known after apply)
+ id = (known after apply)
+ owner_id = (known after apply)
+ region = "us-east-1"
+ tags = {
+ "Name" = "catalyst-example-cluster-dev-dev"
+ "example.com/tf-aws-complete-ecs-fargate-cluster/v1/bundle-alias" = "catalyst-example-cluster-dev-dev"
+ "example.com/tf-aws-complete-ecs-fargate-cluster/v1/bundle-uuid" = "11ee759d-2862-422f-9bb7-31fb9223930a"
}
+ tags_all = {
+ "Name" = "catalyst-example-cluster-dev-dev"
+ "example.com/tf-aws-complete-ecs-fargate-cluster/v1/bundle-alias" = "catalyst-example-cluster-dev-dev"
+ "example.com/tf-aws-complete-ecs-fargate-cluster/v1/bundle-uuid" = "11ee759d-2862-422f-9bb7-31fb9223930a"
}
+ vpc_id = (known after apply)
}
# module.vpc.aws_nat_gateway.this[0] will be created
+ resource "aws_nat_gateway" "this" {
+ allocation_id = (known after apply)
+ association_id = (known after apply)
+ auto_provision_zones = (known after apply)
+ auto_scaling_ips = (known after apply)
+ availability_mode = (known after apply)
+ connectivity_type = "public"
+ id = (known after apply)
+ network_interface_id = (known after apply)
+ private_ip = (known after apply)
+ public_ip = (known after apply)
+ region = "us-east-1"
+ regional_nat_gateway_address = (known after apply)
+ regional_nat_gateway_auto_mode = (known after apply)
+ route_table_id = (known after apply)
+ secondary_allocation_ids = (known after apply)
+ secondary_private_ip_address_count = (known after apply)
+ secondary_private_ip_addresses = (known after apply)
+ subnet_id = (known after apply)
+ tags = {
+ "Name" = "catalyst-example-cluster-dev-dev-us-east-1a"
+ "example.com/tf-aws-complete-ecs-fargate-cluster/v1/bundle-alias" = "catalyst-example-cluster-dev-dev"
+ "example.com/tf-aws-complete-ecs-fargate-cluster/v1/bundle-uuid" = "11ee759d-2862-422f-9bb7-31fb9223930a"
}
+ tags_all = {
+ "Name" = "catalyst-example-cluster-dev-dev-us-east-1a"
+ "example.com/tf-aws-complete-ecs-fargate-cluster/v1/bundle-alias" = "catalyst-example-cluster-dev-dev"
+ "example.com/tf-aws-complete-ecs-fargate-cluster/v1/bundle-uuid" = "11ee759d-2862-422f-9bb7-31fb9223930a"
}
+ vpc_id = (known after apply)
}
# module.vpc.aws_route.private_nat_gateway[0] will be created
+ resource "aws_route" "private_nat_gateway" {
+ destination_cidr_block = "0.0.0.0/0"
+ id = (known after apply)
+ instance_id = (known after apply)
+ instance_owner_id = (known after apply)
+ nat_gateway_id = (known after apply)
+ network_interface_id = (known after apply)
+ origin = (known after apply)
+ region = "us-east-1"
+ route_table_id = (known after apply)
+ state = (known after apply)
+ timeouts {
+ create = "5m"
}
}
# module.vpc.aws_route.public_internet_gateway[0] will be created
+ resource "aws_route" "public_internet_gateway" {
+ destination_cidr_block = "0.0.0.0/0"
+ gateway_id = (known after apply)
+ id = (known after apply)
+ instance_id = (known after apply)
+ instance_owner_id = (known after apply)
+ network_interface_id = (known after apply)
+ origin = (known after apply)
+ region = "us-east-1"
+ route_table_id = (known after apply)
+ state = (known after apply)
+ timeouts {
+ create = "5m"
}
}
# module.vpc.aws_route_table.private[0] will be created
+ resource "aws_route_table" "private" {
+ arn = (known after apply)
+ id = (known after apply)
+ owner_id = (known after apply)
+ propagating_vgws = (known after apply)
+ region = "us-east-1"
+ route = (known after apply)
+ tags = {
+ "Name" = "catalyst-example-cluster-dev-dev-private"
+ "example.com/tf-aws-complete-ecs-fargate-cluster/v1/bundle-alias" = "catalyst-example-cluster-dev-dev"
+ "example.com/tf-aws-complete-ecs-fargate-cluster/v1/bundle-uuid" = "11ee759d-2862-422f-9bb7-31fb9223930a"
}
+ tags_all = {
+ "Name" = "catalyst-example-cluster-dev-dev-private"
+ "example.com/tf-aws-complete-ecs-fargate-cluster/v1/bundle-alias" = "catalyst-example-cluster-dev-dev"
+ "example.com/tf-aws-complete-ecs-fargate-cluster/v1/bundle-uuid" = "11ee759d-2862-422f-9bb7-31fb9223930a"
}
+ vpc_id = (known after apply)
}
# module.vpc.aws_route_table.public[0] will be created
+ resource "aws_route_table" "public" {
+ arn = (known after apply)
+ id = (known after apply)
+ owner_id = (known after apply)
+ propagating_vgws = (known after apply)
+ region = "us-east-1"
+ route = (known after apply)
+ tags = {
+ "Name" = "catalyst-example-cluster-dev-dev-public"
+ "example.com/tf-aws-complete-ecs-fargate-cluster/v1/bundle-alias" = "catalyst-example-cluster-dev-dev"
+ "example.com/tf-aws-complete-ecs-fargate-cluster/v1/bundle-uuid" = "11ee759d-2862-422f-9bb7-31fb9223930a"
}
+ tags_all = {
+ "Name" = "catalyst-example-cluster-dev-dev-public"
+ "example.com/tf-aws-complete-ecs-fargate-cluster/v1/bundle-alias" = "catalyst-example-cluster-dev-dev"
+ "example.com/tf-aws-complete-ecs-fargate-cluster/v1/bundle-uuid" = "11ee759d-2862-422f-9bb7-31fb9223930a"
}
+ vpc_id = (known after apply)
}
# module.vpc.aws_route_table_association.private[0] will be created
+ resource "aws_route_table_association" "private" {
+ id = (known after apply)
+ region = "us-east-1"
+ route_table_id = (known after apply)
+ subnet_id = (known after apply)
}
# module.vpc.aws_route_table_association.private[1] will be created
+ resource "aws_route_table_association" "private" {
+ id = (known after apply)
+ region = "us-east-1"
+ route_table_id = (known after apply)
+ subnet_id = (known after apply)
}
# module.vpc.aws_route_table_association.private[2] will be created
+ resource "aws_route_table_association" "private" {
+ id = (known after apply)
+ region = "us-east-1"
+ route_table_id = (known after apply)
+ subnet_id = (known after apply)
}
# module.vpc.aws_route_table_association.public[0] will be created
+ resource "aws_route_table_association" "public" {
+ id = (known after apply)
+ region = "us-east-1"
+ route_table_id = (known after apply)
+ subnet_id = (known after apply)
}
# module.vpc.aws_route_table_association.public[1] will be created
+ resource "aws_route_table_association" "public" {
+ id = (known after apply)
+ region = "us-east-1"
+ route_table_id = (known after apply)
+ subnet_id = (known after apply)
}
# module.vpc.aws_route_table_association.public[2] will be created
+ resource "aws_route_table_association" "public" {
+ id = (known after apply)
+ region = "us-east-1"
+ route_table_id = (known after apply)
+ subnet_id = (known after apply)
}
# module.vpc.aws_subnet.private[0] will be created
+ resource "aws_subnet" "private" {
+ arn = (known after apply)
+ assign_ipv6_address_on_creation = false
+ availability_zone = "us-east-1a"
+ availability_zone_id = (known after apply)
+ cidr_block = "10.0.0.0/20"
+ enable_dns64 = false
+ enable_resource_name_dns_a_record_on_launch = false
+ enable_resource_name_dns_aaaa_record_on_launch = false
+ id = (known after apply)
+ ipv6_cidr_block_association_id = (known after apply)
+ ipv6_native = false
+ map_public_ip_on_launch = false
+ owner_id = (known after apply)
+ private_dns_hostname_type_on_launch = (known after apply)
+ region = "us-east-1"
+ tags = {
+ "Name" = "catalyst-example-cluster-dev-dev-private-us-east-1a"
+ "example.com/tf-aws-complete-ecs-fargate-cluster/v1/bundle-alias" = "catalyst-example-cluster-dev-dev"
+ "example.com/tf-aws-complete-ecs-fargate-cluster/v1/bundle-uuid" = "11ee759d-2862-422f-9bb7-31fb9223930a"
}
+ tags_all = {
+ "Name" = "catalyst-example-cluster-dev-dev-private-us-east-1a"
+ "example.com/tf-aws-complete-ecs-fargate-cluster/v1/bundle-alias" = "catalyst-example-cluster-dev-dev"
+ "example.com/tf-aws-complete-ecs-fargate-cluster/v1/bundle-uuid" = "11ee759d-2862-422f-9bb7-31fb9223930a"
}
+ vpc_id = (known after apply)
}
# module.vpc.aws_subnet.private[1] will be created
+ resource "aws_subnet" "private" {
+ arn = (known after apply)
+ assign_ipv6_address_on_creation = false
+ availability_zone = "us-east-1b"
+ availability_zone_id = (known after apply)
+ cidr_block = "10.0.16.0/20"
+ enable_dns64 = false
+ enable_resource_name_dns_a_record_on_launch = false
+ enable_resource_name_dns_aaaa_record_on_launch = false
+ id = (known after apply)
+ ipv6_cidr_block_association_id = (known after apply)
+ ipv6_native = false
+ map_public_ip_on_launch = false
+ owner_id = (known after apply)
+ private_dns_hostname_type_on_launch = (known after apply)
+ region = "us-east-1"
+ tags = {
+ "Name" = "catalyst-example-cluster-dev-dev-private-us-east-1b"
+ "example.com/tf-aws-complete-ecs-fargate-cluster/v1/bundle-alias" = "catalyst-example-cluster-dev-dev"
+ "example.com/tf-aws-complete-ecs-fargate-cluster/v1/bundle-uuid" = "11ee759d-2862-422f-9bb7-31fb9223930a"
}
+ tags_all = {
+ "Name" = "catalyst-example-cluster-dev-dev-private-us-east-1b"
+ "example.com/tf-aws-complete-ecs-fargate-cluster/v1/bundle-alias" = "catalyst-example-cluster-dev-dev"
+ "example.com/tf-aws-complete-ecs-fargate-cluster/v1/bundle-uuid" = "11ee759d-2862-422f-9bb7-31fb9223930a"
}
+ vpc_id = (known after apply)
}
# module.vpc.aws_subnet.private[2] will be created
+ resource "aws_subnet" "private" {
+ arn = (known after apply)
+ assign_ipv6_address_on_creation = false
+ availability_zone = "us-east-1c"
+ availability_zone_id = (known after apply)
+ cidr_block = "10.0.32.0/20"
+ enable_dns64 = false
+ enable_resource_name_dns_a_record_on_launch = false
+ enable_resource_name_dns_aaaa_record_on_launch = false
+ id = (known after apply)
+ ipv6_cidr_block_association_id = (known after apply)
+ ipv6_native = false
+ map_public_ip_on_launch = false
+ owner_id = (known after apply)
+ private_dns_hostname_type_on_launch = (known after apply)
+ region = "us-east-1"
+ tags = {
+ "Name" = "catalyst-example-cluster-dev-dev-private-us-east-1c"
+ "example.com/tf-aws-complete-ecs-fargate-cluster/v1/bundle-alias" = "catalyst-example-cluster-dev-dev"
+ "example.com/tf-aws-complete-ecs-fargate-cluster/v1/bundle-uuid" = "11ee759d-2862-422f-9bb7-31fb9223930a"
}
+ tags_all = {
+ "Name" = "catalyst-example-cluster-dev-dev-private-us-east-1c"
+ "example.com/tf-aws-complete-ecs-fargate-cluster/v1/bundle-alias" = "catalyst-example-cluster-dev-dev"
+ "example.com/tf-aws-complete-ecs-fargate-cluster/v1/bundle-uuid" = "11ee759d-2862-422f-9bb7-31fb9223930a"
}
+ vpc_id = (known after apply)
}
# module.vpc.aws_subnet.public[0] will be created
+ resource "aws_subnet" "public" {
+ arn = (known after apply)
+ assign_ipv6_address_on_creation = false
+ availability_zone = "us-east-1a"
+ availability_zone_id = (known after apply)
+ cidr_block = "10.0.48.0/24"
+ enable_dns64 = false
+ enable_resource_name_dns_a_record_on_launch = false
+ enable_resource_name_dns_aaaa_record_on_launch = false
+ id = (known after apply)
+ ipv6_cidr_block_association_id = (known after apply)
+ ipv6_native = false
+ map_public_ip_on_launch = false
+ owner_id = (known after apply)
+ private_dns_hostname_type_on_launch = (known after apply)
+ region = "us-east-1"
+ tags = {
+ "Name" = "catalyst-example-cluster-dev-dev-public-us-east-1a"
+ "example.com/tf-aws-complete-ecs-fargate-cluster/v1/bundle-alias" = "catalyst-example-cluster-dev-dev"
+ "example.com/tf-aws-complete-ecs-fargate-cluster/v1/bundle-uuid" = "11ee759d-2862-422f-9bb7-31fb9223930a"
}
+ tags_all = {
+ "Name" = "catalyst-example-cluster-dev-dev-public-us-east-1a"
+ "example.com/tf-aws-complete-ecs-fargate-cluster/v1/bundle-alias" = "catalyst-example-cluster-dev-dev"
+ "example.com/tf-aws-complete-ecs-fargate-cluster/v1/bundle-uuid" = "11ee759d-2862-422f-9bb7-31fb9223930a"
}
+ vpc_id = (known after apply)
}
# module.vpc.aws_subnet.public[1] will be created
+ resource "aws_subnet" "public" {
+ arn = (known after apply)
+ assign_ipv6_address_on_creation = false
+ availability_zone = "us-east-1b"
+ availability_zone_id = (known after apply)
+ cidr_block = "10.0.49.0/24"
+ enable_dns64 = false
+ enable_resource_name_dns_a_record_on_launch = false
+ enable_resource_name_dns_aaaa_record_on_launch = false
+ id = (known after apply)
+ ipv6_cidr_block_association_id = (known after apply)
+ ipv6_native = false
+ map_public_ip_on_launch = false
+ owner_id = (known after apply)
+ private_dns_hostname_type_on_launch = (known after apply)
+ region = "us-east-1"
+ tags = {
+ "Name" = "catalyst-example-cluster-dev-dev-public-us-east-1b"
+ "example.com/tf-aws-complete-ecs-fargate-cluster/v1/bundle-alias" = "catalyst-example-cluster-dev-dev"
+ "example.com/tf-aws-complete-ecs-fargate-cluster/v1/bundle-uuid" = "11ee759d-2862-422f-9bb7-31fb9223930a"
}
+ tags_all = {
+ "Name" = "catalyst-example-cluster-dev-dev-public-us-east-1b"
+ "example.com/tf-aws-complete-ecs-fargate-cluster/v1/bundle-alias" = "catalyst-example-cluster-dev-dev"
+ "example.com/tf-aws-complete-ecs-fargate-cluster/v1/bundle-uuid" = "11ee759d-2862-422f-9bb7-31fb9223930a"
}
+ vpc_id = (known after apply)
}
# module.vpc.aws_subnet.public[2] will be created
+ resource "aws_subnet" "public" {
+ arn = (known after apply)
+ assign_ipv6_address_on_creation = false
+ availability_zone = "us-east-1c"
+ availability_zone_id = (known after apply)
+ cidr_block = "10.0.50.0/24"
+ enable_dns64 = false
+ enable_resource_name_dns_a_record_on_launch = false
+ enable_resource_name_dns_aaaa_record_on_launch = false
+ id = (known after apply)
+ ipv6_cidr_block_association_id = (known after apply)
+ ipv6_native = false
+ map_public_ip_on_launch = false
+ owner_id = (known after apply)
+ private_dns_hostname_type_on_launch = (known after apply)
+ region = "us-east-1"
+ tags = {
+ "Name" = "catalyst-example-cluster-dev-dev-public-us-east-1c"
+ "example.com/tf-aws-complete-ecs-fargate-cluster/v1/bundle-alias" = "catalyst-example-cluster-dev-dev"
+ "example.com/tf-aws-complete-ecs-fargate-cluster/v1/bundle-uuid" = "11ee759d-2862-422f-9bb7-31fb9223930a"
}
+ tags_all = {
+ "Name" = "catalyst-example-cluster-dev-dev-public-us-east-1c"
+ "example.com/tf-aws-complete-ecs-fargate-cluster/v1/bundle-alias" = "catalyst-example-cluster-dev-dev"
+ "example.com/tf-aws-complete-ecs-fargate-cluster/v1/bundle-uuid" = "11ee759d-2862-422f-9bb7-31fb9223930a"
}
+ vpc_id = (known after apply)
}
# module.vpc.aws_vpc.this[0] will be created
+ resource "aws_vpc" "this" {
+ arn = (known after apply)
+ cidr_block = "10.0.0.0/16"
+ default_network_acl_id = (known after apply)
+ default_route_table_id = (known after apply)
+ default_security_group_id = (known after apply)
+ dhcp_options_id = (known after apply)
+ enable_dns_hostnames = true
+ enable_dns_support = true
+ enable_network_address_usage_metrics = (known after apply)
+ id = (known after apply)
+ instance_tenancy = "default"
+ ipv6_association_id = (known after apply)
+ ipv6_cidr_block = (known after apply)
+ ipv6_cidr_block_network_border_group = (known after apply)
+ main_route_table_id = (known after apply)
+ owner_id = (known after apply)
+ region = "us-east-1"
+ tags = {
+ "Name" = "catalyst-example-cluster-dev-dev"
+ "example.com/tf-aws-complete-ecs-fargate-cluster/v1/bundle-alias" = "catalyst-example-cluster-dev-dev"
+ "example.com/tf-aws-complete-ecs-fargate-cluster/v1/bundle-uuid" = "11ee759d-2862-422f-9bb7-31fb9223930a"
}
+ tags_all = {
+ "Name" = "catalyst-example-cluster-dev-dev"
+ "example.com/tf-aws-complete-ecs-fargate-cluster/v1/bundle-alias" = "catalyst-example-cluster-dev-dev"
+ "example.com/tf-aws-complete-ecs-fargate-cluster/v1/bundle-uuid" = "11ee759d-2862-422f-9bb7-31fb9223930a"
}
}
Plan: 23 to add, 0 to change, 0 to destroy.
module.vpc.aws_vpc.this[0]: Creating...
module.vpc.aws_vpc.this[0]: Still creating... [00m10s elapsed]
module.vpc.aws_vpc.this[0]: Creation complete after 16s [id=vpc-05440b79bd1132941]
module.vpc.aws_internet_gateway.this[0]: Creating...
module.vpc.aws_route_table.public[0]: Creating...
module.vpc.aws_default_route_table.default[0]: Creating...
module.vpc.aws_default_security_group.this[0]: Creating...
module.vpc.aws_subnet.public[2]: Creating...
module.vpc.aws_subnet.private[2]: Creating...
module.vpc.aws_subnet.public[1]: Creating...
module.vpc.aws_subnet.private[0]: Creating...
module.vpc.aws_subnet.public[0]: Creating...
module.vpc.aws_default_network_acl.this[0]: Creating...
module.vpc.aws_default_route_table.default[0]: Creation complete after 2s [id=rtb-0db937478daf0dddf]
module.vpc.aws_route_table.private[0]: Creating...
module.vpc.aws_internet_gateway.this[0]: Creation complete after 2s [id=igw-0d8b2479c9593d429]
module.vpc.aws_subnet.private[1]: Creating...
module.vpc.aws_subnet.public[1]: Creation complete after 2s [id=subnet-05e5ab979c70651da]
module.vpc.aws_eip.nat[0]: Creating...
module.vpc.aws_route_table.public[0]: Creation complete after 2s [id=rtb-04af50ceb69668b84]
module.vpc.aws_route.public_internet_gateway[0]: Creating...
module.vpc.aws_subnet.private[0]: Creation complete after 3s [id=subnet-04ebf039147b9b9ff]
module.vpc.aws_subnet.public[0]: Creation complete after 3s [id=subnet-0a5550f93ed12cfd4]
module.vpc.aws_subnet.private[1]: Creation complete after 2s [id=subnet-02046f201aa6d602d]
module.vpc.aws_route_table.private[0]: Creation complete after 2s [id=rtb-0c29ee99cbe5a59f8]
module.vpc.aws_eip.nat[0]: Creation complete after 3s [id=eipalloc-0a3d5266d78749438]
module.vpc.aws_route.public_internet_gateway[0]: Creation complete after 3s [id=r-rtb-04af50ceb69668b841080289494]
module.vpc.aws_default_security_group.this[0]: Creation complete after 5s [id=sg-02296790b7982ad2b]
module.vpc.aws_default_network_acl.this[0]: Creation complete after 5s [id=acl-0f570704b06fd0616]
module.vpc.aws_subnet.private[2]: Creation complete after 5s [id=subnet-07481371564631a6b]
module.vpc.aws_route_table_association.private[1]: Creating...
module.vpc.aws_route_table_association.private[2]: Creating...
module.vpc.aws_route_table_association.private[0]: Creating...
module.vpc.aws_route_table_association.private[2]: Creation complete after 2s [id=rtbassoc-00e4169c2e5d3eeee]
module.vpc.aws_route_table_association.private[0]: Creation complete after 2s [id=rtbassoc-01edc369ef660e519]
module.vpc.aws_route_table_association.private[1]: Creation complete after 2s [id=rtbassoc-07e9c2b2894bbdb1a]
module.vpc.aws_subnet.public[2]: Creation complete after 7s [id=subnet-03442f0165d327700]
module.vpc.aws_route_table_association.public[2]: Creating...
module.vpc.aws_route_table_association.public[0]: Creating...
module.vpc.aws_route_table_association.public[1]: Creating...
module.vpc.aws_nat_gateway.this[0]: Creating...
module.vpc.aws_route_table_association.public[1]: Creation complete after 1s [id=rtbassoc-0d66b73d5153d2c58]
module.vpc.aws_route_table_association.public[2]: Creation complete after 1s [id=rtbassoc-06206735df5028475]
module.vpc.aws_route_table_association.public[0]: Creation complete after 1s [id=rtbassoc-06830bbc3c4b0dcde]
module.vpc.aws_nat_gateway.this[0]: Still creating... [00m10s elapsed]
module.vpc.aws_nat_gateway.this[0]: Still creating... [00m20s elapsed]
module.vpc.aws_nat_gateway.this[0]: Still creating... [00m30s elapsed]
module.vpc.aws_nat_gateway.this[0]: Still creating... [00m40s elapsed]
module.vpc.aws_nat_gateway.this[0]: Still creating... [00m50s elapsed]
module.vpc.aws_nat_gateway.this[0]: Still creating... [01m00s elapsed]
module.vpc.aws_nat_gateway.this[0]: Still creating... [01m10s elapsed]
module.vpc.aws_nat_gateway.this[0]: Still creating... [01m20s elapsed]
module.vpc.aws_nat_gateway.this[0]: Still creating... [01m30s elapsed]
module.vpc.aws_nat_gateway.this[0]: Still creating... [01m40s elapsed]
module.vpc.aws_nat_gateway.this[0]: Creation complete after 1m49s [id=nat-0cf1981f9f52fe030]
module.vpc.aws_route.private_nat_gateway[0]: Creating...
module.vpc.aws_route.private_nat_gateway[0]: Creation complete after 2s [id=r-rtb-0c29ee99cbe5a59f81080289494]
Apply complete! Resources: 23 added, 0 changed, 0 destroyed.
terramate: Entering stack in /stacks/dev/s3/catalyst-example-bucket
terramate: Executing command "terraform apply -auto-approve"
module.s3_bucket.data.aws_region.current: Reading...
module.s3_bucket.data.aws_partition.current: Reading...
module.s3_bucket.data.aws_caller_identity.current: Reading...
module.s3_bucket.data.aws_canonical_user_id.this[0]: Reading...
module.s3_bucket.data.aws_partition.current: Read complete after 0s [id=aws]
module.s3_bucket.data.aws_region.current: Read complete after 0s [id=us-east-1]
module.s3_bucket.aws_s3_bucket.this[0]: Refreshing state... [id=catalyst-example-bucket]
module.s3_bucket.data.aws_caller_identity.current: Read complete after 1s [id=975086131449]
module.s3_bucket.data.aws_canonical_user_id.this[0]: Read complete after 1s [id=9da783ff7be6e9971d5ad7ce8956eb03ea19ecbe4c1250ace4ad596753f83e80]
module.s3_bucket.aws_s3_bucket_versioning.this[0]: Refreshing state... [id=catalyst-example-bucket]
module.s3_bucket.aws_s3_bucket_server_side_encryption_configuration.this[0]: Refreshing state... [id=catalyst-example-bucket]
module.s3_bucket.aws_s3_bucket_public_access_block.this[0]: Refreshing state... [id=catalyst-example-bucket]
module.s3_bucket.aws_s3_bucket_ownership_controls.this[0]: Refreshing state... [id=catalyst-example-bucket]
module.s3_bucket.aws_s3_bucket_acl.this[0]: Refreshing state... [id=catalyst-example-bucket,public-read]
No changes. Your infrastructure matches the configuration.
Terraform has compared your real infrastructure against your configuration and found no differences, so no changes are needed.
Apply complete! Resources: 0 added, 0 changed, 0 destroyed.
terramate: Entering stack in /stacks/dev/ecs-clusters/catalyst-example-cluster-dev/alb
terramate: Executing command "terraform apply -auto-approve"
module.alb.data.aws_partition.current[0]: Reading...
module.alb.data.aws_partition.current[0]: Read complete after 0s [id=aws]
Terraform used the selected providers to generate the following execution plan. Resource actions are indicated with the following symbols:
+ create
<= read (data resources)
Terraform will perform the following actions:
# data.aws_subnets.public will be read during apply
# (config refers to values not yet known)
<= data "aws_subnets" "public" {
+ id = (known after apply)
+ ids = (known after apply)
+ region = (known after apply)
+ tags = (known after apply)
+ filter {
+ name = "tag:Name"
+ values = [
+ "*-public-*",
]
}
+ filter {
+ name = "vpc-id"
+ values = [
+ (known after apply),
]
}
}
# data.aws_vpc.vpc_by_tags will be read during apply
# (depends on a resource or a module with changes pending)
<= data "aws_vpc" "vpc_by_tags" {
+ arn = (known after apply)
+ cidr_block = (known after apply)
+ cidr_block_associations = (known after apply)
+ default = (known after apply)
+ dhcp_options_id = (known after apply)
+ enable_dns_hostnames = (known after apply)
+ enable_dns_support = (known after apply)
+ enable_network_address_usage_metrics = (known after apply)
+ id = (known after apply)
+ instance_tenancy = (known after apply)
+ ipv6_association_id = (known after apply)
+ ipv6_cidr_block = (known after apply)
+ main_route_table_id = (known after apply)
+ owner_id = (known after apply)
+ region = (known after apply)
+ state = (known after apply)
+ tags = (known after apply)
+ filter {
+ name = "tag:example.com/tf-aws-complete-ecs-fargate-cluster/v1/bundle-uuid"
+ values = [
+ "11ee759d-2862-422f-9bb7-31fb9223930a",
]
}
}
# null_resource.initial_deployment_trigger will be created
+ resource "null_resource" "initial_deployment_trigger" {
+ id = (known after apply)
}
# module.alb.aws_lb.this[0] will be created
+ resource "aws_lb" "this" {
+ arn = (known after apply)
+ arn_suffix = (known after apply)
+ client_keep_alive = 3600
+ desync_mitigation_mode = "defensive"
+ dns_name = (known after apply)
+ drop_invalid_header_fields = true
+ enable_deletion_protection = false
+ enable_http2 = true
+ enable_tls_version_and_cipher_suite_headers = false
+ enable_waf_fail_open = false
+ enable_xff_client_port = false
+ enable_zonal_shift = false
+ enforce_security_group_inbound_rules_on_private_link_traffic = (known after apply)
+ id = (known after apply)
+ idle_timeout = 60
+ internal = (known after apply)
+ ip_address_type = (known after apply)
+ load_balancer_type = "application"
+ name = "catalyst-example-cluster-dev-dev"
+ name_prefix = (known after apply)
+ preserve_host_header = false
+ region = "us-east-1"
+ secondary_ips_auto_assigned_per_subnet = (known after apply)
+ security_groups = (known after apply)
+ subnets = (known after apply)
+ tags = {
+ "example.com/tf-aws-complete-ecs-fargate-cluster/v1/bundle-alias" = "catalyst-example-cluster-dev-dev"
+ "example.com/tf-aws-complete-ecs-fargate-cluster/v1/bundle-uuid" = "11ee759d-2862-422f-9bb7-31fb9223930a"
+ "terraform-aws-modules" = "alb"
}
+ tags_all = {
+ "example.com/tf-aws-complete-ecs-fargate-cluster/v1/bundle-alias" = "catalyst-example-cluster-dev-dev"
+ "example.com/tf-aws-complete-ecs-fargate-cluster/v1/bundle-uuid" = "11ee759d-2862-422f-9bb7-31fb9223930a"
+ "terraform-aws-modules" = "alb"
}
+ vpc_id = (known after apply)
+ xff_header_processing_mode = "append"
+ zone_id = (known after apply)
+ subnet_mapping (known after apply)
}
# module.alb.aws_lb_listener.this["http"] will be created
+ resource "aws_lb_listener" "this" {
+ arn = (known after apply)
+ id = (known after apply)
+ load_balancer_arn = (known after apply)
+ port = 80
+ protocol = "HTTP"
+ region = "us-east-1"
+ routing_http_request_x_amzn_mtls_clientcert_header_name = (known after apply)
+ routing_http_request_x_amzn_mtls_clientcert_issuer_header_name = (known after apply)
+ routing_http_request_x_amzn_mtls_clientcert_leaf_header_name = (known after apply)
+ routing_http_request_x_amzn_mtls_clientcert_serial_number_header_name = (known after apply)
+ routing_http_request_x_amzn_mtls_clientcert_subject_header_name = (known after apply)
+ routing_http_request_x_amzn_mtls_clientcert_validity_header_name = (known after apply)
+ routing_http_request_x_amzn_tls_cipher_suite_header_name = (known after apply)
+ routing_http_request_x_amzn_tls_version_header_name = (known after apply)
+ routing_http_response_access_control_allow_credentials_header_value = (known after apply)
+ routing_http_response_access_control_allow_headers_header_value = (known after apply)
+ routing_http_response_access_control_allow_methods_header_value = (known after apply)
+ routing_http_response_access_control_allow_origin_header_value = (known after apply)
+ routing_http_response_access_control_expose_headers_header_value = (known after apply)
+ routing_http_response_access_control_max_age_header_value = (known after apply)
+ routing_http_response_content_security_policy_header_value = (known after apply)
+ routing_http_response_server_enabled = (known after apply)
+ routing_http_response_strict_transport_security_header_value = (known after apply)
+ routing_http_response_x_content_type_options_header_value = (known after apply)
+ routing_http_response_x_frame_options_header_value = (known after apply)
+ ssl_policy = (known after apply)
+ tags = {
+ "example.com/tf-aws-complete-ecs-fargate-cluster/v1/bundle-alias" = "catalyst-example-cluster-dev-dev"
+ "example.com/tf-aws-complete-ecs-fargate-cluster/v1/bundle-uuid" = "11ee759d-2862-422f-9bb7-31fb9223930a"
+ "terraform-aws-modules" = "alb"
}
+ tags_all = {
+ "example.com/tf-aws-complete-ecs-fargate-cluster/v1/bundle-alias" = "catalyst-example-cluster-dev-dev"
+ "example.com/tf-aws-complete-ecs-fargate-cluster/v1/bundle-uuid" = "11ee759d-2862-422f-9bb7-31fb9223930a"
+ "terraform-aws-modules" = "alb"
}
+ tcp_idle_timeout_seconds = (known after apply)
+ default_action {
+ order = (known after apply)
+ type = "fixed-response"
+ fixed_response {
+ content_type = "text/plain"
+ status_code = "200"
}
}
+ mutual_authentication (known after apply)
}
# module.alb.aws_security_group.this[0] will be created
+ resource "aws_security_group" "this" {
+ arn = (known after apply)
+ description = "Security group for catalyst-example-cluster-dev-dev application load balancer"
+ egress = (known after apply)
+ id = (known after apply)
+ ingress = (known after apply)
+ name = (known after apply)
+ name_prefix = "catalyst-example-cluster-dev-dev-"
+ owner_id = (known after apply)
+ region = "us-east-1"
+ revoke_rules_on_delete = false
+ tags = {
+ "example.com/tf-aws-complete-ecs-fargate-cluster/v1/bundle-alias" = "catalyst-example-cluster-dev-dev"
+ "example.com/tf-aws-complete-ecs-fargate-cluster/v1/bundle-uuid" = "11ee759d-2862-422f-9bb7-31fb9223930a"
+ "terraform-aws-modules" = "alb"
}
+ tags_all = {
+ "example.com/tf-aws-complete-ecs-fargate-cluster/v1/bundle-alias" = "catalyst-example-cluster-dev-dev"
+ "example.com/tf-aws-complete-ecs-fargate-cluster/v1/bundle-uuid" = "11ee759d-2862-422f-9bb7-31fb9223930a"
+ "terraform-aws-modules" = "alb"
}
+ vpc_id = (known after apply)
}
# module.alb.aws_vpc_security_group_egress_rule.this["all"] will be created
+ resource "aws_vpc_security_group_egress_rule" "this" {
+ arn = (known after apply)
+ cidr_ipv4 = "10.0.0.0/16"
+ id = (known after apply)
+ ip_protocol = "-1"
+ region = "us-east-1"
+ security_group_id = (known after apply)
+ security_group_rule_id = (known after apply)
+ tags = {
+ "Name" = "catalyst-example-cluster-dev-dev-all"
+ "example.com/tf-aws-complete-ecs-fargate-cluster/v1/bundle-alias" = "catalyst-example-cluster-dev-dev"
+ "example.com/tf-aws-complete-ecs-fargate-cluster/v1/bundle-uuid" = "11ee759d-2862-422f-9bb7-31fb9223930a"
}
+ tags_all = {
+ "Name" = "catalyst-example-cluster-dev-dev-all"
+ "example.com/tf-aws-complete-ecs-fargate-cluster/v1/bundle-alias" = "catalyst-example-cluster-dev-dev"
+ "example.com/tf-aws-complete-ecs-fargate-cluster/v1/bundle-uuid" = "11ee759d-2862-422f-9bb7-31fb9223930a"
}
}
# module.alb.aws_vpc_security_group_ingress_rule.this["all_http"] will be created
+ resource "aws_vpc_security_group_ingress_rule" "this" {
+ arn = (known after apply)
+ cidr_ipv4 = "0.0.0.0/0"
+ from_port = 80
+ id = (known after apply)
+ ip_protocol = "tcp"
+ region = "us-east-1"
+ security_group_id = (known after apply)
+ security_group_rule_id = (known after apply)
+ tags = {
+ "Name" = "catalyst-example-cluster-dev-dev-all_http"
+ "example.com/tf-aws-complete-ecs-fargate-cluster/v1/bundle-alias" = "catalyst-example-cluster-dev-dev"
+ "example.com/tf-aws-complete-ecs-fargate-cluster/v1/bundle-uuid" = "11ee759d-2862-422f-9bb7-31fb9223930a"
}
+ tags_all = {
+ "Name" = "catalyst-example-cluster-dev-dev-all_http"
+ "example.com/tf-aws-complete-ecs-fargate-cluster/v1/bundle-alias" = "catalyst-example-cluster-dev-dev"
+ "example.com/tf-aws-complete-ecs-fargate-cluster/v1/bundle-uuid" = "11ee759d-2862-422f-9bb7-31fb9223930a"
}
+ to_port = 80
}
Plan: 6 to add, 0 to change, 0 to destroy.
null_resource.initial_deployment_trigger: Creating...
null_resource.initial_deployment_trigger: Creation complete after 0s [id=5577006791947779410]
data.aws_vpc.vpc_by_tags: Reading...
data.aws_vpc.vpc_by_tags: Read complete after 3s [id=vpc-05440b79bd1132941]
data.aws_subnets.public: Reading...
module.alb.aws_security_group.this[0]: Creating...
data.aws_subnets.public: Read complete after 0s [id=us-east-1]
module.alb.aws_security_group.this[0]: Creation complete after 4s [id=sg-09f232fe11cf6b646]
module.alb.aws_lb.this[0]: Creating...
module.alb.aws_vpc_security_group_egress_rule.this["all"]: Creating...
module.alb.aws_vpc_security_group_ingress_rule.this["all_http"]: Creating...
module.alb.aws_vpc_security_group_ingress_rule.this["all_http"]: Creation complete after 1s [id=sgr-09a2ffb70265d23e5]
module.alb.aws_vpc_security_group_egress_rule.this["all"]: Creation complete after 1s [id=sgr-057ec0fd672c929ce]
module.alb.aws_lb.this[0]: Still creating... [00m10s elapsed]
module.alb.aws_lb.this[0]: Still creating... [00m20s elapsed]
module.alb.aws_lb.this[0]: Still creating... [00m30s elapsed]
module.alb.aws_lb.this[0]: Still creating... [00m40s elapsed]
module.alb.aws_lb.this[0]: Still creating... [00m50s elapsed]
module.alb.aws_lb.this[0]: Still creating... [01m00s elapsed]
module.alb.aws_lb.this[0]: Still creating... [01m10s elapsed]
module.alb.aws_lb.this[0]: Still creating... [01m20s elapsed]
module.alb.aws_lb.this[0]: Still creating... [01m30s elapsed]
module.alb.aws_lb.this[0]: Still creating... [01m40s elapsed]
module.alb.aws_lb.this[0]: Still creating... [01m50s elapsed]
module.alb.aws_lb.this[0]: Still creating... [02m00s elapsed]
module.alb.aws_lb.this[0]: Still creating... [02m10s elapsed]
module.alb.aws_lb.this[0]: Still creating... [02m20s elapsed]
module.alb.aws_lb.this[0]: Still creating... [02m30s elapsed]
module.alb.aws_lb.this[0]: Still creating... [02m40s elapsed]
module.alb.aws_lb.this[0]: Still creating... [02m50s elapsed]
module.alb.aws_lb.this[0]: Still creating... [03m00s elapsed]
module.alb.aws_lb.this[0]: Still creating... [03m10s elapsed]
module.alb.aws_lb.this[0]: Creation complete after 3m10s [id=arn:aws:elasticloadbalancing:us-east-1:975086131449:loadbalancer/app/catalyst-example-cluster-dev-dev/b2bc4eaff035783c]
module.alb.aws_lb_listener.this["http"]: Creating...
module.alb.aws_lb_listener.this["http"]: Creation complete after 4s [id=arn:aws:elasticloadbalancing:us-east-1:975086131449:listener/app/catalyst-example-cluster-dev-dev/b2bc4eaff035783c/ab8ad7d8c709f6ec]
Apply complete! Resources: 6 added, 0 changed, 0 destroyed.And that’s it — you just deployed an ECS cluster with a VPC and ALB in minutes. What usually takes even experienced developers hours now becomes a guided, repeatable workflow — without requiring deep Terraform or OpenTofu knowledge, and without giving up the benefits of infrastructure as code.
Example: Deploy a Nginx Container on ECS Fargate
In our last example, we want to demonstrate how easy it is with Terramate Catalyst to create relationships and dependencies across bundles. The tf-aws-ecs-fargate-service Bundle in our example repository allows us to deploy any container as a service on ECS Fargate. Run terramate scaffold again and choose the ECS Fargate Service bundle again to see what is happening.
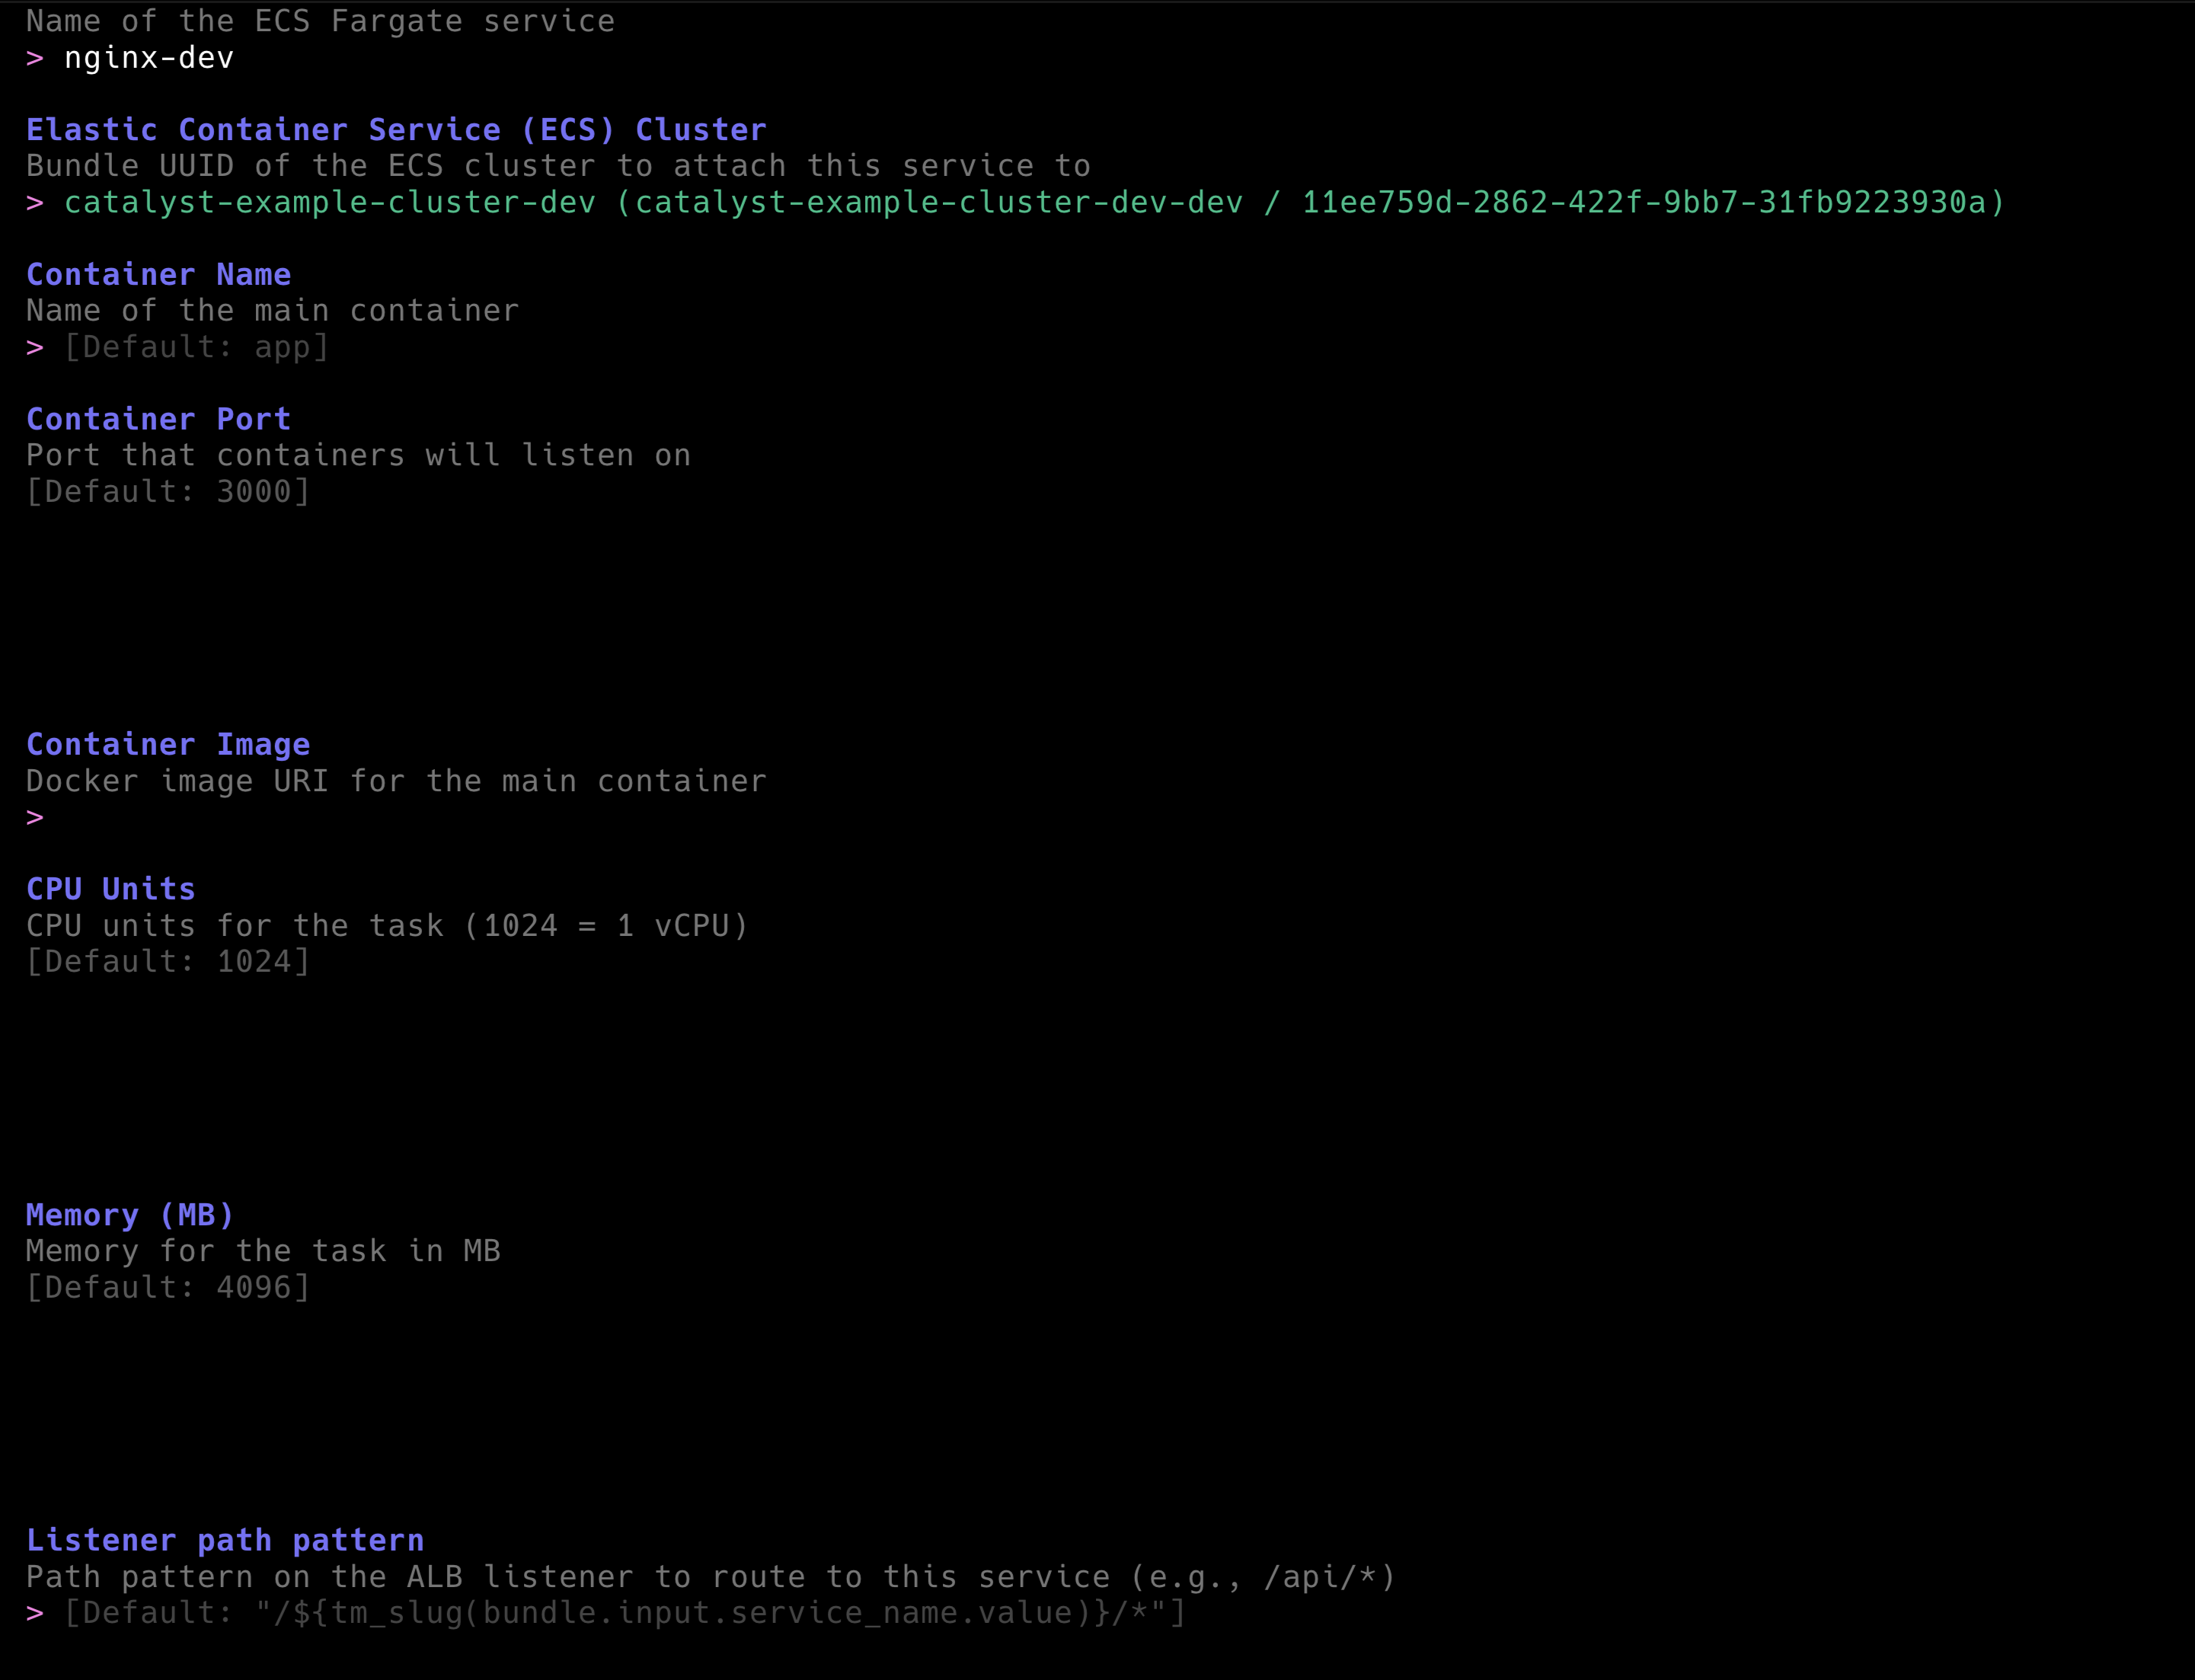
Before you start configuring your service, you will notice that Terramate Catalyst provides you with a list of existing ECS Clusters to deploy the service in. This works because in Terramate Catalyst, we can query for existing Bundles when providing input options to users. E.g., in the inputs.tm.hcl of the ECS Service Bundle, you can see the following configuration:
inputs.tm.hcl
input "cluster_slug" {
  type        = string
  description = "Bundle UUID of the ECS cluster to attach this service to"

  # scaffolding configuration
  allowed_values = [
    for cluster in tm_bundles("example.com/tf-aws-complete-ecs-fargate-cluster/v1") :
    { name = "${cluster.input.name.value} (${cluster.export.alias.value} / ${cluster.uuid})", value = cluster.export.alias.value }
  ]
  prompt                = "Elastic Container Service (ECS) Cluster"
  required_for_scaffold = true
}
This essentially provides a list of all available ECS Fargate Clusters to deploy the service in. We then use tags in the Terraform configuration of the ECS Service component to query for the right cluster to deploy the service in.
Let's deploy a simple Nginx container in your existing ECS Fargate Cluster using the following configuration:
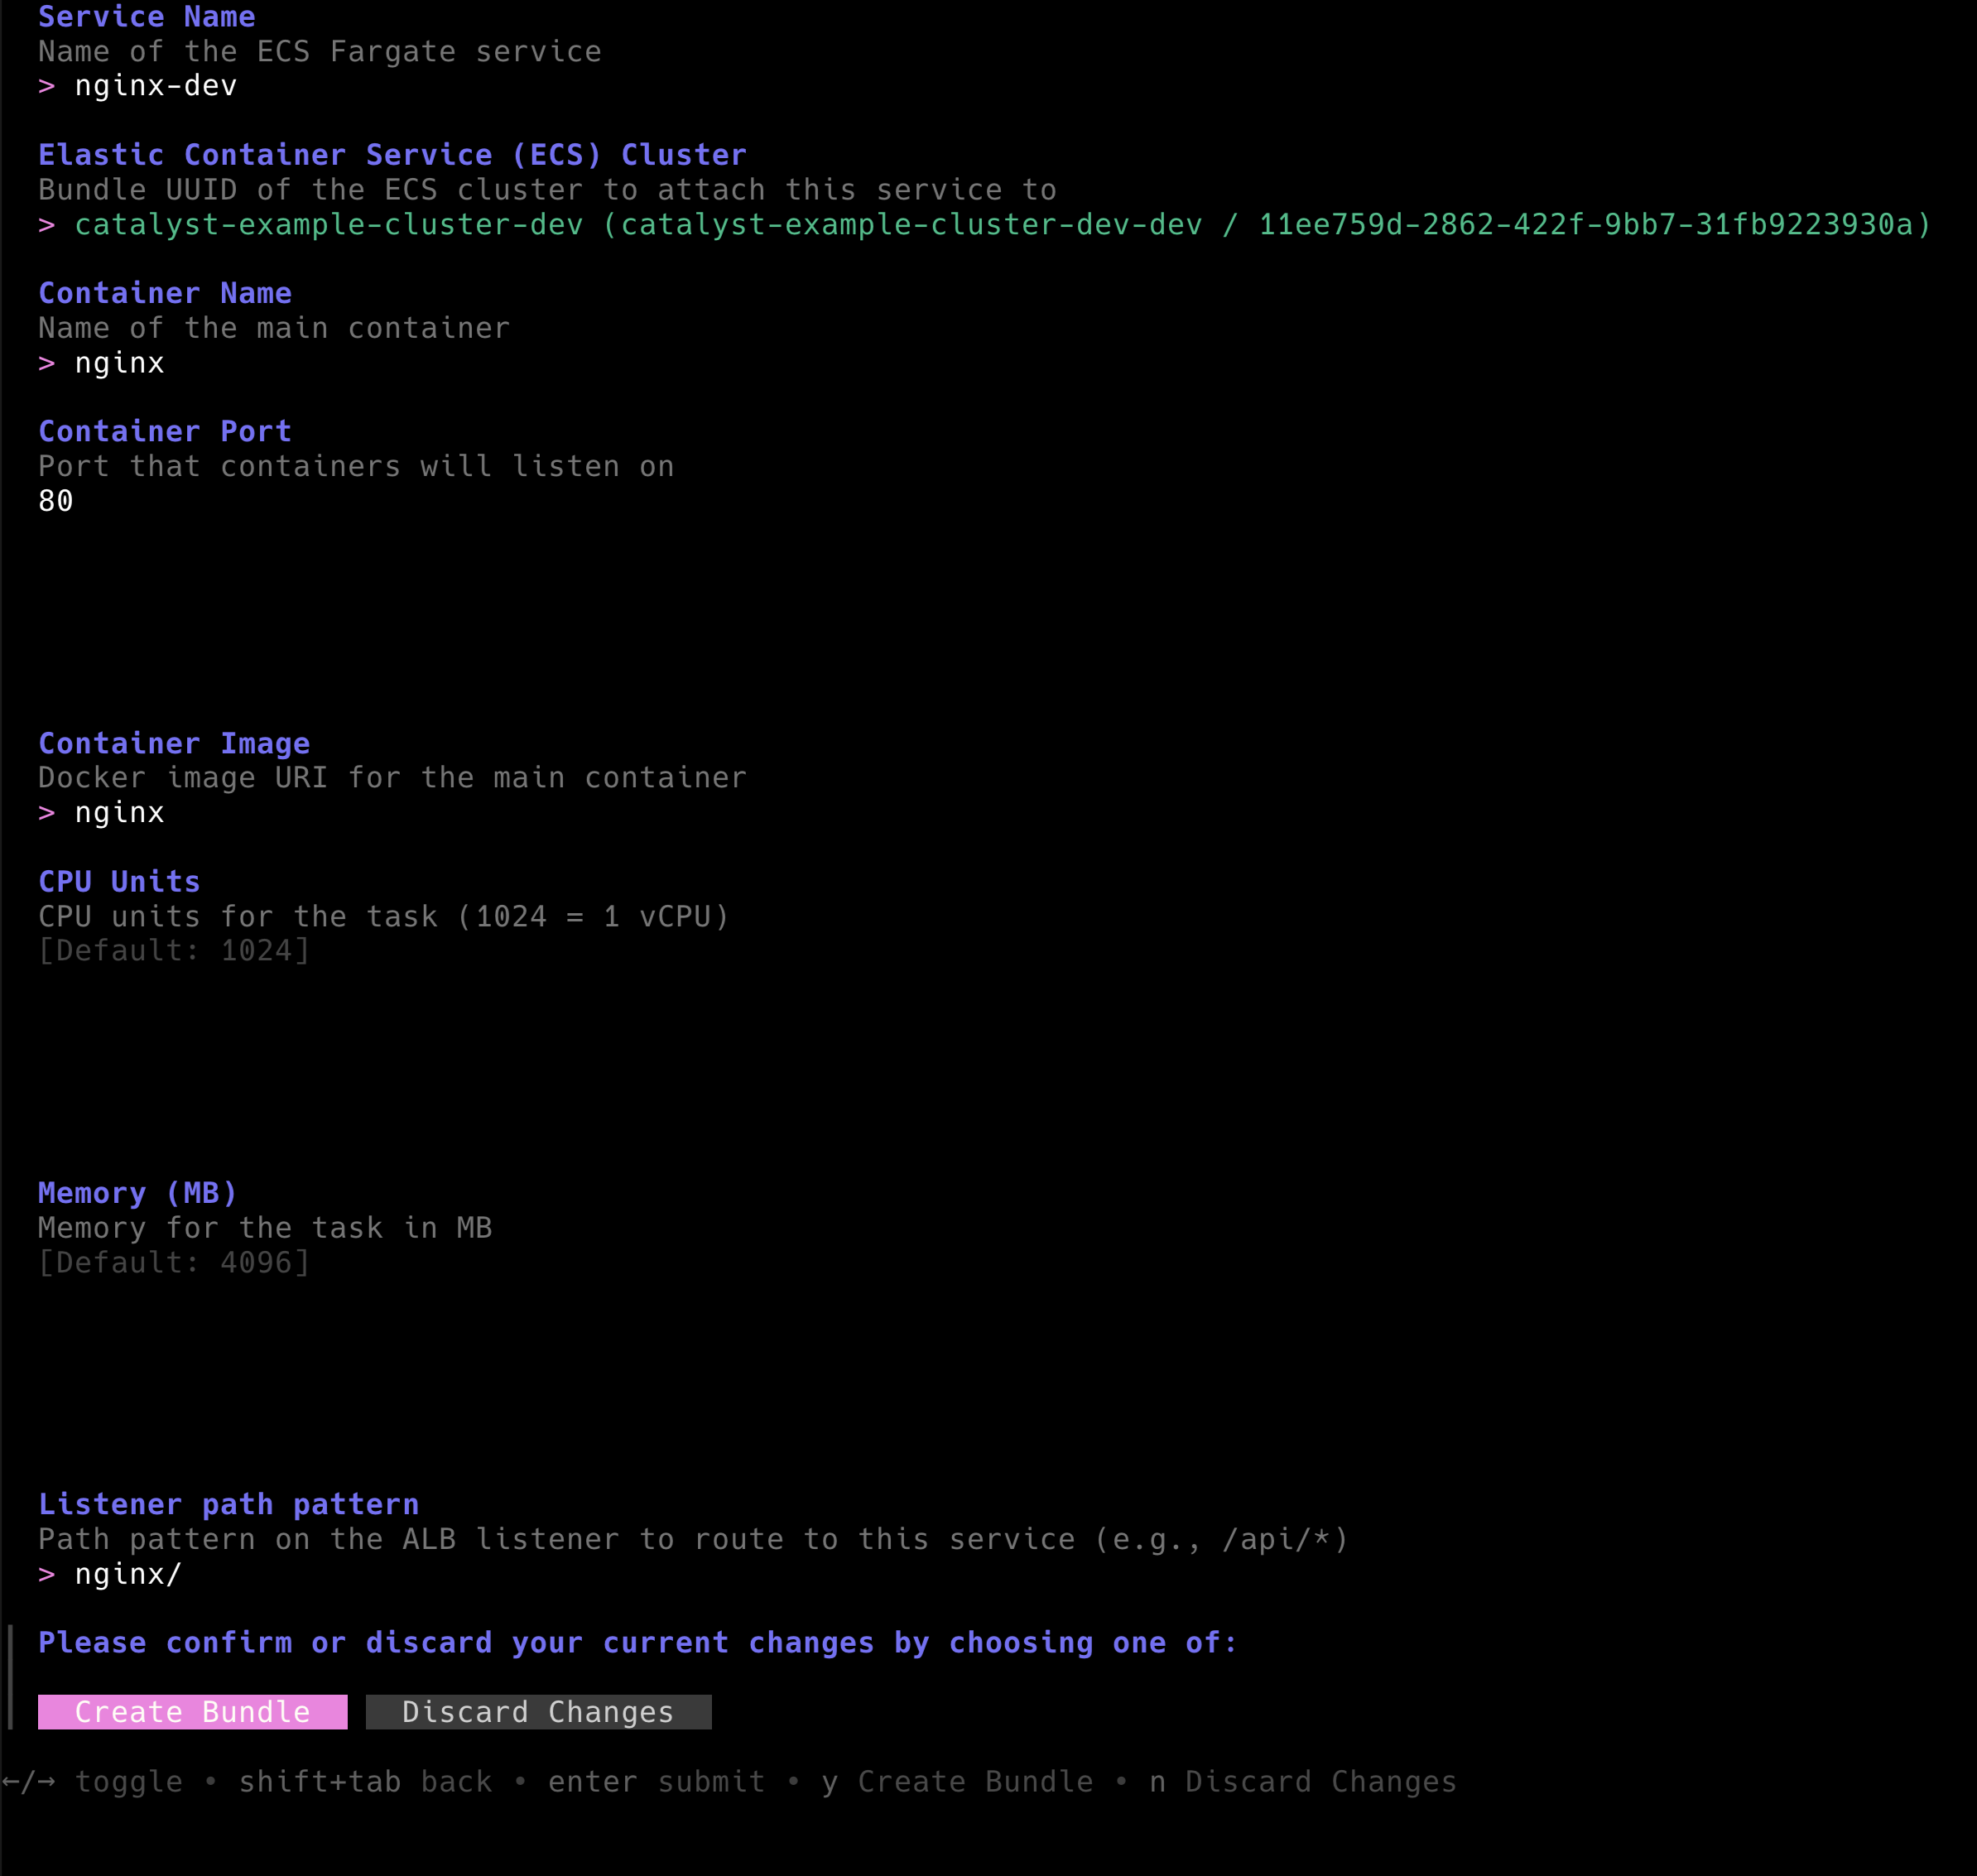 The outcome of this is the newly created
 nginx-dev.tm.yml containing the configuration required to deploy the service on ECS Fargate.
nginx-dev.tm.yml
apiVersion: terramate.io/cli/v1
kind: BundleInstance
metadata:
  name: nginx-dev
  uuid: ea2b8cb3-e159-40c9-9861-958ea76b2d97
spec:
  source: /bundles/example.com/tf-aws-ecs-fargate-service/v1
  inputs:

    # Name of the ECS Fargate service
    service_name: nginx-dev

    # Bundle UUID of the ECS cluster to attach this service to
    cluster_slug: catalyst-example-cluster-dev-dev

    # Name of the main container
    container_name: nginx

    # Port that containers will listen on
    container_port: 80

    # Docker image URI for the main container
    container_image: nginx

    # CPU units for the task (1024 = 1 vCPU)
    cpu: 1024

    # Memory for the task in MB
    memory: 4096

    # Path pattern on the ALB listener to route to this service (e.g., /api/*)
    path_pattern: nginx/

    # Key/name of the target group in the ALB (e.g., 'http', 'ex_ecs')
    target_group_key: http
Next, create all Terramate Stacks and scaffold the Terraform configuration by running terramate generate again.
❯ terramate generate

Code generation report

Successes:

- /stacks/dev/ecs-clusters/catalyst-example-cluster-dev/alb
	[~] component_alb_main.tf

- /stacks/dev/ecs-clusters/catalyst-example-cluster-dev/workloads/nginx-dev
	[+] backend.tf
	[+] component_ecs-service_imports.tf
	[+] component_ecs-service_main.tf
	[+] stack.tm.hcl
	[+] terraform.tf
This is exactly why we configured the ALB Bundle to detect and incorporate any existing ECS Services. To expose a new ECS Service to the public internet, the load balancer needs a corresponding listener rule and target group — and Catalyst automatically updates the ALB stack to include them.
That’s how Bundle-to-Bundle relationships work in Terramate Catalyst: Bundles can react to and extend infrastructure created by other Bundles to keep the system consistent and fully wired up.
component_alb_main.tf
...

listeners = {
  http = {
    fixed_response = {
      content_type = "text/plain"
      status_code  = "200"
    }
    port     = 80
    protocol = "HTTP"
    rules = {
      catalyst-example-cluster-dev-dev-nginx-dev = {
        actions = [
          {
            forward = {
              target_group_key = "catalyst-example-cluster-dev-dev-nginx-dev"
            }
          },
        ]
        conditions = [
          {
            path_pattern = {
              values = [
                "nginx/",
              ]
            }
          },
        ]
        priority = 5000
      }
    }
  }
}

...
Summary
That’s it — you’ve just seen how Terramate Catalyst enables infrastructure self-service for developers who aren’t infrastructure experts.
With Catalyst, they can provision standardized, secure, and compliant infrastructure in minutes — without needing constant DevOps support. It delivers the promise of “AI-powered infra,” but without AI's probabilistic behavior.
If you’d like an expert to help assess your self-service potential, feel free to schedule a call with us.
Important Links:
- Terramate Catalyst (https://github.com/terramate-io/terramate-catalyst)
- Examples Repository (https://github.com/terramate-io/terramate-catalyst-examples)